Using the Mac Pro's 2 extra onboard SATA Ports
with NewerTech Cable Kit and External SATA Case Kit
By: "Vader"
Posted: May 4th, 2007
Updated May 9th, 2007 (more comments on Cable Install)
Updated Jan 16th, 2008 (info on using SATA ports w/Windows)
Updated July 24th, 2008 (problem w/LaCie d2 Quadra drive)
Updated again Aug 11th, 2008 (more reports on ext. cases)
(Reader report from May 2007 email)
Thought I'd update you on a recent purchase of mine, and how it panned out.
I wanted the ability to make a bit-for-bit copy of all the data on my Mac
Pro, and since I've got 4 x 250GB drives in there, I was going to need a full TB
of backup space. I looked into the new Hitachi 1TB drives, but the availability (in May 2007) was still limited, and the price per GB is not in line with other options (for bare OEM drive, no enclosure, no interface, no shipping, no tax, etc.!)
(NOTE: OWC Drive prices mentioned were from 2007, see their current Drive listings page for later pricing and capacities (as well as SSDs). Also check current pricing on the eSATA Extender Cable Adapter used in this article as prices can change over time. OWC also now has Install Videos for 2008 Mac Pro and Install Videos for 2006/2007 Mac Pros for this eSATA cable/extender kit.
Another option, although more limited is to put a hard drive in the Mac Pro's 2nd Optical bay (see this guide) using a SATA cable to the unused onboard SATA port or the 2nd Optical drive connector on the ATA/100 cable.)
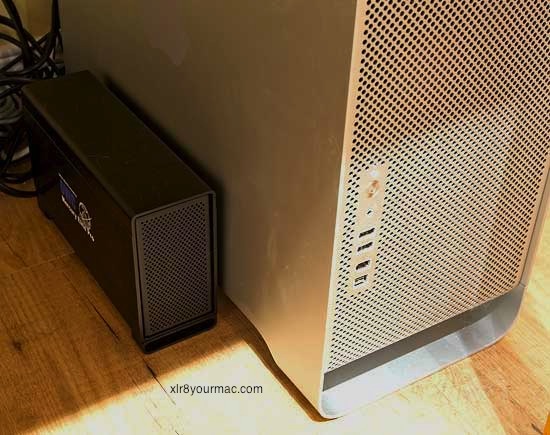
What I ended up doing was getting two 500 GB Maxtor Maxline Pros from OWC, one of their black dual eSATA enclosures (Note: as of 2009, case was alum/silver color), and the Newer Technology SATA Cable Kit/PCI bracket that routes the two extra SATA ports from the Mac Pro's logic board to the back of the computer.
The enclosure was just $67.95 and the bracket $24.95 (in 2007). I am in Canada. With the exchange rate, tax, customs, shipping and everything, the grand total when all was said and done was just under $500 CAD (May 2007), a 50 cents per GB (in Canadian currency) cost for a fully bootable, dual-channel SATA RAIDable (software), 1TB of space in a slick black aluminum enclosure, shipped internationally. (FYI, with current pricing (2008) you could get two 1TB drives, case, cables, etc. for less, depending on drive brand/model.) The shipping was literally < 24 hours from ordering (i.e., I got my stuff in less than a day from ordering). Good on OWC and UPS. That's never happened to me before when ordering from US to Canada.
The build of the enclosure is beautiful, and echoes the design style of the Mac Pro. Installation of the drives is a breeze. Everything is machined with precision.
(Photo shows original black model, current model is silver)
Where the process initially fell down, though, was when I went to install the PCI bracket/cables. I figured it would just be... plug in the leads to the logic board, screw in the bracket, good to go! But I opened the installation manual anyway. It said:
Remove the memory risers (whah??), remove four screws, remove your video card (huh??), slide the memory case to the right, unpop this plastic cover thing, then (get this) use a blank PCI slot cover (!!!) to shim and work off the fan casing! Remove the fan casing, unscrew the PCI slot support (towards the front of the case), remove all four internal drives, THEN (finally) plug in the leads, route the wires up around behind the hard drive bays, install the bracket, then put everything back.
Well, frankly, I was having none of that. I just reached carefully in behind
the PCI slot support and fiddled until I got the leads plugged in blindly. (Also see later comments on this from another NT Cable Kit owner below. Hemostats are good to have around...) Screw routing the leads. They're stiff and just stay in the middle of the case nicely, not touching anything. Took probably 3-5 minutes of patient fiddling. I couldn't believe the major surgery they expect you to go through. Incredible. (I assume the instructions were for routing the cables completely out of the way? Or for better access to the motherboard ports?)
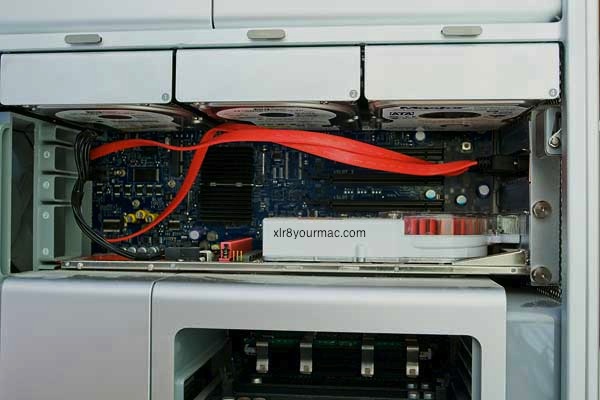
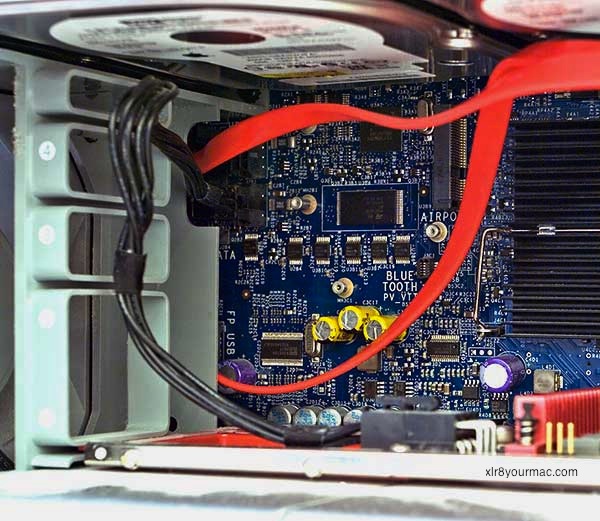
(He later sent some photos)
Here are some pics. Photographing where the leads plug into the logic board, however, is impossible. It is totally obscured by that pesky grey plastic (long card support/guide) thingy... :-)
Anyhow, I got everything hooked up and installed. Works great. Very, very fast, and I didn't even RAID0 them. XBench actually gave a single 500GB drive 98 MB/sec sequential read transfer rate, which is almost what my 2x250 GB RAID0 volume gets (old SATA1 drives, though). The enclosure fan is not too intrusive as long as you don't place the enclosure on any resonant object or space. On the floor, it is quite silent next to my Mac Pro which has 4 drives in it. Having them come up as two separate 500 GB drives works great, because I can back up my 500GB RAID0 media volume and my 500GB boot/download volumes simultaneously, all on separate SATA channels, so the process is very speedy.
The only "gotcha" I may have fallen prey to (gotta check this at home later this evening), is I think eSATA devices might not be hot swappable. That is, the manual says that eSATA devices are only detected at start up. I was hoping to be able to unmount the drives and power off the enclosure when not backing up, to save drive life and power (although, 5 year warranty and 1.5 million hours MTBF), and then just power up the enclosure whenever I wanted to backup. Maybe not able to? I'll have to check tonight. (BTW - there was post in the April 23rd, 2007 news here with notes on Mac Pro onboard SATA chipset and drive swaps. I've mirrored it below to save a click. He later wrote.)
I tested it out, and I can unmount the drives just fine, by "ejecting" them in the finder, but when I power off the enclosure, a few seconds later I get a kernel panic (yes, my first one ever on my Mac Pro). This actually (ironically) worked out for the best. I ended up moving the enclosure to the laminate floor beside the Mac Pro, and now I can't hear the enclosure over the Mac Pro tower, so I just leave it on 24/7. Then I set up Retrospect to carry out a complete system backup every night at 2:00 AM. Worked like a charm last night, everything is cloned to the external drives. The drives still spin down, and for all intents and purposes, are seen as just two more internal drives to OS X.
Anyway, just thought maybe some other Mac Pro owners might be interested in a great cost-effective option.
-"Vader"
And likely less now as prices drop over time.
Reader Replies on SATA Cable Kit/Install: (most recent first)
(added 5/9/2007)
"I just finished doing this according to NewerTech's instructions - taking everything out, etc. as is described in your recent article. Let me tell you - they're not kidding when they say that Apple has fouled up in terms of making the memory bay mounting screws almost unremovable by using Loctite in the wrong place, effectively welding the screws to the standoffs they mate
with.
(This was mentioned last fall on the early shipments, hopefully corrected on later builds. (It is per comments below from a more recent build Mac Pro.)
It's probably not practical for this area, but I've used heat to loosen loctite on some applications, but that was for screws on automobiles for instance where there was no chance of damaging adjacent parts - not in cramped quarters like this. It may not help, but if you have a (higher wattage) soldering iron tip you could try that to heat up the loctite. I don't own one of these to see if that's practical/would get the loctite hot enough to soften it. (The standoff may sink off heat depending on the base it's in and never get hot enough.) Not sure what grade (color) of Loctite they used either.)
It was simply not possible to remove one of the screws on my machine using a Phillips screwdriver even when stabilizing the standoff with a flat 7mm wrench slipped under the memory bay's bottom.
(I asked Seth when he bought his Mac Pro, to see if it was an early shipment)
Mine dates back to last fall - September, I think. That screw was no joke. Couldn't get it out any other way. No way to grab it with tiny Channel-Lock pliers or with a Vise-Grip, and I'm a handy type when it comes to such things. I finally had to use a Dremel Moto-Tool with a carbide disc to slice a slot across the entire screw head so I could use a large straight-bladed screwdriver to get a grip on that screw and with tremendous effort finally withdraw it and get the memory bay housing out. I packed rags into the memory bay to keep grinding dust (there was very little) out of the logic board and CPUs. The rest of the install was straightforward. My suggestion: try installing the cables using a hemostat or needle-nose pliers with a little spaghetti tubing over the tips if you're nervous and bag the disassembly routine.
-Seth L."
(added 5/9/2007)
"I thought I would comment because I installed the kit the way they suggest by taking the Mac pro apart. It turned out to be not that big a deal, although i did hesitate at first and then took a deep breath and slowly followed the directions exactly, and it all worked fine. The good news is that the Mac Pro actually comes apart easily. (His Mac Pro is not an early build.) I didnt have to force anything.
The fan assembly is on a track and plugs directly into the board. The memory bay simply needs to be unscrewed and scooted over a tiny bit. All the parts inside fit into each other perfectly and come apart easily.I would suggest plenty of light as there are a lot of very fine wires around the hard drive docks (Wireless/BT antenna wires) and you want to put the new sata wires safely behind them. One issue noted in the manual is that on certain Mac Pros the bottom two screws in the memory bay had the locktite in the wrong spot and required holding the nut with a thin tool of some kind. I got mine a month ago and it did not have this problem.
I'm booting the mac from a Softraid mirror attached to the 2 new ports.
-Peter
"
(added 5/7/2007)
"Thought I'd drop a line to echo Vader's comments regarding the Newer Tech SATA extender cable/bracket for the Mac Pro.
I installed mine much the same way Vader did - I didn't dismantle the Mac Pro's casing, but I will tell you I wasn't able to simply connect the cables to the motherboard posts blindly. I had to use a flashlight and a pair of needle nose pliers to seat the connectors. It was kind of a pain and took a good 10 minutes of trial and error, but it is doable. If you want to mount the cables more neatly or not risk scratching the motherboard with your needle nose grips, then following the (long) instructions is probably better.
I moved a (WD Raptor) 74GB 10,000 RPM drive out of the Mac Pro's case and into an
external SATA case (OWC's single drive "quad" interface (SATA/FW800/FW400/USB 2.0) case). From both a performance and OS/Finder perspective, the drive may as well still be mounted internally. The BSD volume name is disk4s2 for those who are interested in such things.
Interestingly, while hard drives 1-4 are labeled as being in "Bay 1" and so forth by the Apple System Profiler and Disk Utility, these apps know enough not to label the two "external" ports as Bay 5 and Bay 6. The Finder icon is that of a standard internal hard drive, not that of an external, ejectable drive.
I haven't tried to dismount and power down the external case to replicate Vader's kernel panic. I think I'll take his word on this one.
I also have not yet tried to access a device on these ports in Windows via Boot Camp. (Note: See notes below on Windows use/tips)
All in all, its a very slick way to add two more full-speed SATA II ports to your machine for nearly no cost.
-Cadaver"
A Copy of the April 23rd, 2007 news page post is below (in reply to eSATA Extender cables (w/PCI slot bracket) from NewerTech for use with the 2 unused ports on the Mac Pro motherboard.)
"
this may be of some interest for your readers.
From the Intel 631xESB/632xESB I/O Controller Hub data sheet:
"Hot-Plug Operation
Dynamic Hot-Plug (for example, surprise removal) is not supported by the SATA host controller. However, using the PCS register configuration bits and power management flows, a device can be powered down by software, and the port can then be powered off, allowing removal and insertion of a new device."
(I asked if he knew of any way to do that in OS X.)
the SATA controller does support AHCI mode, which enables hot plugging (same as with the raid southbridges ICH6R - ICH8R which support hot plugging with raid drivers from Intel without Intel assuring this).
But it does not support AHCI if the PATA port is used as in the Mac Pro. And without AHCI there is no way to do hot plugging. Using a SATA DVD drive may not mean AHCI is used automatically. The controller has to be switched from IDE to AHCI mode. Maybe the Mac Pro does it on startup or some EFI specialist can finds out how to do that.
BTW Tiger can handle an ICH8R in AHCI mode on all SATA ports without a problem.
Kind regards,
Martin S."
Info/Tips on using Spare SATA Ports with Windows: (from Jan 15th, 2008 news page) This may have come up in the past and I'd forgotten it (don't own a Mac Pro yet) but in reply to a post yesterday (1/15/2008) on the Pioneer SATA Blu-Ray reader/Superdrive combo drive, a reader mentioned the spare SATA ports are not usable in Windows XP at least with the standard drivers with Bootcamp. (Most readers have used the ports in OS X although I've not searched drive db reports for anyone that mentioned using Bootcamp/Windows also. BTW - The spare ports are bootable for OS X use, as noted in this article - although drives are not shown/usable when booted from Windows with standard drivers.)
(Update) Here's a reader mail w/tips on using the spare ports with Windows via a replacement chipset driver install and grub bootloader edit:
"
after finding this thread in the onmac forums (forum.onmac.net/showthread.php?t=2739) I finally was able to get my pioneer sata drive to work under bootcamp. Basically you have to do the following:
- Install Win XP and ubuntu linux with a pata dvd drive in XP, change the ide 2680 driver to the intel ahci driver found here (downloadcenter.intel.com) S5000 Based Server AHCI SATA Storage Driver for Windows.
- Boot into ubuntu and change the stage1 file of the grub bootloader to this:
www.olofsson.info/grub/stage1
This keeps the mac pro in ahci mode when booting a foreign OS
Now you can boot windows using the linux partition, this will start grub and keep the mac pro in the correct mode
I also installed Refit to make things a little easier but as far as i know using Alt key when booting should work too.
if anyone tries this and has any questions feel free to ask
-Forrest"
Problems with LaCie d2 Quadra 1TB External Case: (FYI - an eSATA only ext. case is preferred (even some Express34 SATA card owners have noted issues with some multi-interface ext. case/bridges), although a reader above noted using an OWC Quad Interface case OK. Regardless, eSATA-only Ext. cases have less chance of issues than multi-interface bridge board cases, and also typically cost less.)
(added 7/24/2008)
"I've seen people reference the Newer Technology eSATA extender. It sounded like a good product, so I purchased it, and went through the entire installation process per their instructions. Besides one troublesome screw that kept falling during reassembly, I was surprised that installation was actually easier than I expected (and I expected it to be a bear, because the directions require you to take your Mac Pro apart far beyond what many think necessary). In all honesty, it was kinda fun to take my Mac apart.
Now for the bad news. My Mac crashes every time I try to start it connected to my fairly new LaCie external (with current firmware). (Which model of Lacie drive? (they have many) - updated using latest LaCie Update Tool version 2.0.1 (page dated June 23rd, 2008) I assume? (Although not every update to the tool has an update for every drive they sell))
Drive is LaCie d2 Quadra 1TB, I downloaded the LaCie firmware updater a couple of days ago, ran it, and it said my firmware was up to date.
(Just for the record I asked for Mac Pro model and OS X version used)
Early 2008 Dual 3GHz Quad-Core, OS X 10.5.4
The external drive is powered on before the computer (as is required), and the drive works flawlessly with the FW800 connect. But the eSATA connection brings nothing but crashes.
(Does it crash before the OS is loaded? Can you check the logs (Console or ASP can view logs) to see if there's any related entries on the crash? It may not help but I'd also try clearing the system (kext) cache. (Won't fix a hardware compat. issue but has helped with some SATA card controller issues - even Firmtek mentions this at their site.) Lacie may have other suggestions or info though. (That would be the first place I'd ask, since they sell the case kit and other cases have worked.)
And after any crash, I'd run a verify/repair on the drive(s) (Disk Util can only verify the boot drive if run from it - but can do verify and repair on ext./non-boot drives). And personally I also like to disable Spotlight indexing on my external drives (via Spotlight privacy prefs) as Spotlight tries to immediately start indexing any connected drive (which I don't like/want...) and if you use the drive with Leopard and Tiger OS, the index files are not compatible (noted here before from those of us with internal Leopard and Tiger boot drives or have ext. drives we use with macs that have different OS X versions - each boot with the other OS writes its index file on the non-boot drive that had indexing enabled for both OS's))
At first the Mac booted fine, but then it froze up while I was testing the connection with a SuperDuper! smart-update. (I wish you could have just opened the drive in the Finder before trying that, to see if that would have also crashed (it may have).) After that, my mac never started up, I believe it always froze on a blue screen after powering it up.
(Even if you never try it again with eSATA, I'd do a verify/repair on the drive (connected via FW) just as a general rule after what happened. Since the Mac Pro booted with it connected initially OK but crashed after the SD access attempt it's definitely worth doing. Even drives that mount OK/appear ok can have directory or other damage from crashes.)
I was really disappointed when I called for Newer Tech support. You see, Newer Tech treats this product as cable, not an eSATA solution. So as long as the cable is functioning, that's where Newer Tech ends the tech support. I had a strong feeling that the tech had a lot of knowledge about my issue, but that he held back because it was beyond the limitation of their support for the product (or if I'm cynical, I would say they don't want to admit that there are a lot of issues trying to connect eSATA-capable externals to the unsupported SATA ports on the Mac). Of course, Apple does not support the use of these SATA ports, so there is no turning to Apple for advice (and no reason to assume Apple will address any eSATA issues on their end, if there are any). And how can you start blaming the external drive manufacturer, when you're trying to connect their drive to a full-on eSATA hack, (Apple didn't disable these built-in (spare) ports and with no OS mods/no patches (software) required, just using a built-in spare set of ports is not what I'd call a traditional Hack. These ports worked with other cases (PNP although not hot swappable, neither are the other onboard SATA ports). Clearly the ports are 'supported' in OS X, just not used by Apple currently for drives. (Likely for future use of SATA Optical drives.) A driver update/change is required for Windows use however as previously noted above, but no "hacks" required for OS X use.) rather than an official and supported eSATA port?
(Again OS X does support the spare ports (no mods/hacks/patches required - unless 10.5.4 changed that), but logically I'd think it's better to contact/ask the ext. case vendor (Lacie) about this problem rather than the cable vendor. (That would be like expecting every SATA cable mfr to provide support for every SATA drive/bridge/case on the market. I did write NT support to ask if they knew of any known ext. case problems - although as always, the bridge inside can change (OEM mfr, firmware, etc.) at any time.)
And why not ask Lacie support about this? (Maybe they have a suggestion or an unreleased firmware or may have had other reports on issues with eSATA use or could at least confirm it's a common issue.) They may just 'punt' the question (and like any vendor, their first question is going to be the interface it's used with, if you can test it with another SATA system/interface, etc.), but my first reaction (knowing this works with some other cases) would be to contact the case vendor/mfr. And to repeat past discussions, a pure eSATA case would be a safer bet as well as costing less. However there is a report above from an OWC Quad Interface case kit user (with 1st gen Mac Pro, if that matters) but as always, YMMV. Nothing is a sure thing, anything can have problems.)
Upon a little further research, there seems to be scores of people complaining on various forums about problems with eSATA and their Leopard macs (to be fair, there are also people having no problems). There's talk of various chipsets, etc used in the external drives, some of which don't work right, and talk of drives that worked fine until recent versions of the OS. (The issue of ext. eSATA case bridges has also come up here before even on the Express34 cards page - some issues have been seen with multi-interface bridge board cases (pure SATA being preferred/less chance of problems.) And it also costs less typically, although a multi-interface case is a plus for use with systems that do not have eSATA.)
But the bottom line for me is, it's a whole can of worms I wasn't expecting. It seems that a lot of people who recommend this cable may not be aware of the potential roadblocks of trying to connect your external drive to your Mac using the Newer Tech eSATA extender.
My feeling at present is that a decent number of external drives just don't play nice when connected to the secret SATA ports via this extender.
-Rob M.
"
(Update - see Rob's later reply added 8/11/2008 below, where Lacie is issuing an RMA, although this may be just a case where the bridge board used isn't compatible.) There's a few reports above on External cases used OK, but I welcome other reports from Mac Pro (please note if early 2008 model or 1st gen) users of the NT cable kit and external drives. (Include ext. drive model details as well - the more detail the better for adding compatibility info here.
Latest Feedback on Ext. Cases used w/spare SATA Ports: (in reply to request above after recent mail on problems with Lacie Quadra D2 drive. Later mails first)
(added 8/11/2008)
"You had said you were curious what LaCie would say about my problems. (follow-up to his earlier problem report using Lacie Quadra (quad interface 1TB) above.) Well, without too much pushing or testing on my part, I've suddenly been issued warranty service on the drive. So either LaCie is pretty nice, or they are aware that there are issues with their drives. Attached is a PDF of the support exchanges.
Been interesting reading your user reports -- seems I'm in the vast minority with the problems I've had.
Thanks, Rob"
I asked he report back later if any replacement worked.
(added 8/11/2008 from 7/29 mail)
"I have been using the Newer Tech eSATA (cable kit) for about two months. Mac Pro (early 2008, 2.8GHz) with shipped ram. Two WD 500GB (WDC WD6400AAKS-00A7B0) drives in two separate Macally enclosures (eSATA/USB that look like tiny Mac Pro's) from Newegg.
Frequent rotating backups (always one off-site) with excellent results and very fast using SuperDuper Smart Update. I regularly boot from these enclosures to test them. Always power up eSATA(s) before MP. Only one problem recently popped up. Apple Hardware Test reports one error: 4HDD/11/40000004:SATA(2,0). Error doesn't appear on standard short test, only the extended test. Same results with eSATA cables unplugged from rear of MP. I called OWC this AM and tech suggested to unplug cable from logic board using hemostats and rerun test. Much easier said than done. Tech definitely recommended I NOT seek warranty service with this cable extender inside the MP. Could someone run the extended AHT and report back? Had I not run AHT I would be happy as it seems plenty fast to me.
Thanks for providing this great, long-running service to the Mac community. Much appreciated.
-JamieG"
It may be the AHT doesn't expect a connection to the spare/unused onboard SATA ports (older AHTs didn't even fully exercise some aux interfaces - it failed to pick up failed FW ports for instance on some of my older macs), but if anyone else has tested this (please include Mac Pro/AHT version info) let me know.
(added 7/28/2008)
"I put the Newer Tech eSATA (cable kit) in my Mac Pro (March 2008, 2.8GHz) the same day I took it out of the box. I followed the instructions and disassembled everything. My external eSATA drive is a Granite Digital aluminum bay (eSATA only?) with swappable tray containing a Seagate 500GB SATA-II drive. Originally I partitioned it used it with SuperDuper for image backups, now I use it as a single drive for my Time Machine backup. It's powered up whenever the computer is on. I haven't tried hot swapping drives. I've experiences zero problems.
I previously used external eSATA on my G4 with a SIIG eSATA PCI card - also without problem.
-Rick"
(added 7/28/2008)
"i have been booting from a mirror pair attached to the extra ports with the extender cable and generic SATA enclosures for more than a year with no issues ever.
-Peter H."
Any idea of the bridge board used?
(added 7/28/2008)
"if you recall I sent you an email about this a while ago. my RAID with WDC drives kept falling apart, not mounting, not allowing the mac pro to boot, etc. here's a copy:
I have a Mac Pro (not Early 2008) with newertech's internal SATA/eSATA PCI slot cable to use those two unoccupied internal SATA jacks for eSata purposes. I have an external HDD (My Book® Studio Edition w/eSATA/USB2.0/FW ports) plugged into each respective jack on the card via eSATA. Thing is, we keep losing the integrity of the RAID set. We have 2x2 internal RAID sets in the Mac Pro (boot to an external FW drive) that have never had one issue. I'm thinking it might be the internal SATA bus having some kind of conflict with the eSATA portion of the bridge chip in the WD drive. Maybe using an actual native SATA connector on a bare drive would work better, I'm not sure. Still failing, decided not to use it at all.
-E."
(added 7/28/2008)
"I'm using a generic eSATA cable extender to a WD MyBook Home Edition 1 TB. (is it this one? w/eSATA, USB 2.0 + FW400 ports?) The only problem I've seen is that it is essential to have the drive powered
up before the MP boots - otherwise the disk is never detected. Also, and for the same reason, if you should dismount the drive and power it down or disconnect the eSATA cable, the drive will not be detected until the next power cycle of the MacPro.
Regards, Mike"
(added 7/28/2008)
"First thank You for a great site. Details: MacPro 2008, 2.8GHz, Newer Tech cable kit, Case I think I would call it a no name. Interface USB 2.0 and eSata. Internal case is sata (for SATA drives inside). Disk: Maxtor 7L250S0 250GB sata. I use Time Machine. No problems.
Regards, Niels N."
I asked if he had any idea of the bridge board used (ASP may or may not have any info.)
(added 7/25/2008)
"Please check out Sonnet's notes at the bottom about their Tempo series support for multi-interface drive cases.
This is what I use - 100% trouble free since Newer offered their kit.
MESATATBEK (no longer available)
MEFW924AL1K (no longer available)
OWC dual drive black metal case $67 connected to Newer PCI kit.
Also have used OWC Mercury Quad interface w/o trouble. And able to move back and forth from FW to ODD (onboard) SATA.
But If people want to use SATA ODD ports, then use SATA drive cases, but don't blame OWC or Newer when it is the bridge LaCie uses. And maybe stay away from WD and Seagate cases I guess. Not very attractive if they don't work.
Also, some want to blame Apple or claim using ODD ports isn't or may be dropped or isn't supported in some future versions of OS X. The only downside is that they aren't recognized by Vista. The upside: bootable and if you want to use the ODD ports along with some or all of the internal drives in a RAID that works very very well.
LaCie has trouble with their eSATA/FW/USB doesn't surprise me. (anyone know what bridge board they use? (the OEM/mfr ID may be masked though in ASP))
There have been a couple people on Apple Mac Pro Discussion trying to use LaCie, and tried to blame Newer "it doesn't work" and really didn't like hearing that it just "might" be a problem with the equipment they are using. Even tried to blame OWC for "damages." Same problems can occur using Sonnet Tempo controllers as well. Sonnet has some "Technical Notes" on the subject at the bottom of these pages:
www.sonnettech.com/product/tempo_sata_e4p.html
www.sonnettech.com/product/tempo_sata_e2p.html
Sonnet's Tempo™ SATA E4P and E2P:
(5) While some customers have successfully used external hard drives with USB 2.0/eSATA dual interface, these products (based on the Oxford Semiconductor OXU931DS storage controller chip) exhibit underlying errors that prevent them from being fully compatible with this Sonnet product under Mac OS X. Kernel panics occurring when the drive is connected, and the drive not being recognized by the operating system are known issues. These drives include, but are not limited to:
Western Digital My Book™ Premium ES Edition™
Seagate Technology FreeAgent™ Pro
External hard drives with USB 2.0/eSATA dual interface based on the JMicron 20336 are fully compatible. These drives include but are not limited to:
OWC Mercury On-The-Go USB 2.0/eSATA 2.5" PortableSonnet's Fusion D400Q and R400Q quad-interface storage systems are not affected by these issues, and are fully supported."
As a FYI on PCI eSATA cards (also mentioned below), Firmtek's downloads page now has v5.3.2 firmware/driver updates for their eSATA cards with a note "5.3.2 adds compatibility for Oxford 926/936 (bridge board) enclosures". (Some Sonnet cards in the past were firmtek based, although I've not kept up with that... and it's good to check Sonnet's site for updates/info also, or any other controller card vendor you use.)
(added 7/25/2008)
"I've been using a NewerTech Mac Pro 2-Port eSATA Cable Kit with my MacPro 2.66GHz quad for almost ten months now without incident. I use it with a FirmTek SeriTek/2EN2 enclosure configured with dual raptors as a striped scratch disk.
It works great and is very fast. Started with 10.4.10 and now am at 10.5.4 -- all without issue. I must power up the drive before booting the mac or else it won't get recognized. And I can't turn it off until the mac has shut down.
Sleep doesn't seem to be a problem at all with it. I haven't tried booting off it, however. All in all, I'm very happy with the setup.
-Paul"
The first report here (from 2007 - top of page) noted these spare ports were bootable for OS X.
(added 7/25/2008)
"I'm using the NT cable kit and the OWC dual black (SATA) drive case. Two 500 gig hitachi drives Mac OS X software raided together as a striped raid - no problems at all. Worked first time.
raid was built internally, then I got 4 raptor drives to boot with - so I raided those together and bought the NT cable kit and OWC box to house the old raid.
-Don"
(added 7/25/2008)
"Saw your request looking for experiences with the NewerTech cable kit. I bought the kit recently along with an Otherworld Computer Mercury Elite Pro dual SATA enclosure (OWCMESATATBEK). I have two 500 gig drives enclosed that I joined via OS X software RAID to get about a terabyte for use as my Time Machine backup. This is obviously not the RAID configuration for mission critical data, but it works fine for time machine purposes (I also keep a nightly incremental offsite backup on Amazon s3).
This configuration has been running flawlessly 24/7 since May. I do suggest that anyone using external SATA with the Mac Pro's extra ports place those drives on an uninterruptible power source. (and ditto for the computer of course) Since the system assumes that these SATA ports are being used by internal hard drives, bad things could potentially happen if power is cut to the drives while the system is operating.
-Lon S."
A UPS connection for ext. drives also may extend their life in general (filtering line surges, dropouts, etc.) I recently replaced my old UPS with a new APC UPS w/LED screen (1250VA/750W model sold at big-box store locally for the Al iMac primary work machine) which has some nice features including logging power 'events', showing actual load (in Watts and as a percentage of UPS capacity), estimated runtime and input/output voltage levels. I have all my external devices/drives connected to it also - as sometimes during the night there were power blips that caused the system to wake from sleep. (If the powered USB hub, EyeTV 250 plus, etc. were not UPS connected, any power blip on these would trigger a wake.) The first one I bought however developed a very loud buzz (heard from 5ft away) after about a week of use (not due to regulation - input voltage level healthy at 120V, output showed same, buzzed even with no load attached), which they replaced.
(added 7/25/2008)
"I'm replying to your request for feedback on using the spare SATA ports on the Mac Pro. I have a 2008 Single Quad Core 2.8GHz Mac Pro and I'm using the NewerTech cable kit and an OWC Mercury Elite Pro AL Dual SATA drive enclosure ($67.95 at the time) with the original Mac Pro drive (a 320GB Seagate drive) and a 300GB Maxtor drive that I bought a few years ago for my G5. I bought this enclosure because I wanted one without a bridge board/chipset to have more reliable/speedy SATA. I bought it from their specials page link on your site. I'm in Australia and I couldn't find anything like that here for anywhere near their price - really good value. I already have a Firewire 400/800 enclosure as well. I use these two drives for backup - one with Time Machine and the other with Retrospect. I have had absolutely no problems with this setup until last week when the Seagate drive seemed to be having problems. I restarted the computer and the drive didn't mount. It could not be found by Disc Utility or DiskWarrior. I tried resetting the PRAM and the drive mounted and has since been problem free.
(he later wrote)
I also got some RAM at the same time and it arrived well before my Mac Pro did (I had to wait for the GeForce 8800 GT). I got the Mac Pro around mid February and started using the enclosure straight away so that's about 5 months. This computer is generally running 24/7 so the enclosure has rarely been turned off in that time. I am very happy with it.
Regards, Richard"
(added 7/25/2008)
"I'm using a generic SATA cable extender to run a WiebeTech single drive enclosure (ToughTech XE --FW800/usb/esata) containing a WD 750 gb drive (WDC WD7500AAKS-22RBA0). I leave it on all the time, and have had zero problems over the course of the past 7 months of use. 2.66GHz Quad Mac Pro (2006/2007 model), OS X 10.5.4.
Let me know if you have any specific questions about my setup. Thanks for your work,
Clay"
(added 7/25/2008)
"I've been using a WDC WD10EACS-00ZJB0 "Green Power" terabyte drive in a Vantec USB 2.0/eSATA housing on my 2006 4-core 2.66GHz Mac Pro. Connection is via a NewerTech PCI extender linked to the internal spare SATA ports on the logic board. It hasn't been a marriage made in heaven. The housing is a half-speed one, something I learned after purchasing it, finding it wouldn't work and having to call Vantec. The drive has to be jumpered to 1.5 gbps. The Mac Pro will sometimes refuse to boot past the gray screen if the drive is connected but not powered up. Powering it up allows a boot; then it can be dragged off the desktop and the housing powered down. Not a major hassle since I seldom reboot or start up cold but a nuisance nonetheless.
I use this drive and housing combo for overnight Retrospect backups so speed isn't much of an issue for me. I'm considering getting another mechanism and purchasing a RAID 1 capable enclosure; if I do that I'd be inclined to go with FireWire 800 over using my current eSATA arrangement, trading the hot-pluggability and familiarity of FW over eSATA's quirks. I wonder if it would be less problematical to use a true PCI-e eSATA host adapter card. MacPro with 2GB RAM, OS 10.4.11.
-Seth L."
It may or may not be more reliable (there's been issues with some SATA cards also, some vendors have released updates (driver and/or firmware) - the worst episodes I recall were from RocketRaid card owners (driver problems) when Leopard was released last fall (although the majority of problems were reported from PPC mac owners IIRC and personally I'd not buy a Rocketraid card). Firmtek also released some updates (w/firmware) for their Seritek cards for Leopard (v5.3.1 - their downloads page now has v5.3.2 firmware/driver updates for their eSATA cards with a note "5.3.2 adds compatibility for Oxford 926/936 (bridge board) enclosures".)
And of course problems can also be related to the ext. case/bridge. (Of course the actual hard drive can also fail and some models/series/firmware drives have had issues even with onboard SATA. A certain % of anything is going to fail sooner or later and no matter how rare it is that's little consolation when it happens to you.)
AMUG has reviews of a lot of controller cards (some with impressive performance especially when paired with high-end multi-drive enclosures), although as I've said before (most recently on the Express34 card reports page) - if FW800 performance is enough for your needs, I think that's a good option to consider. (I use a Ministack v3 case kit with 1TB drive inside, partitioned in 3 volumes (TM, general file/Eyetv recording storage and a CCC clone of boot drive) - it's connected via FW800 and the builtin FW/USB powered hubs have been very useful. (I may swap the current 1TB for a cooler running WD GP 1TB though as the 7K1000 runs the fan frequently - I do not set ES to allow drive sleep.)
(added 7/25/2008)
"I've had two Antec Actively Cooled Hard Drive Enclosures running for 6 months off the Mac Pro (quad 2.6) "spare" ports. I first tried an OWC dual SATA case and found drives coming and going for no particular reason. The Antecs have been stable with one exception. One just quit working on either port. I had a third hooked up as a USB drive and swapped the two (and the hard drives as well) and the problem has not returned.
-William S."
|
