 The Source for Mac Performance News and Reviews |
|
|
By Ian Published: 7/6/2001 |
|
IMPORTANT NOTE: This article used the motherboard from the original "Sawtooth" pre-summer 2000 (pre-Gigabit G4) model. Later models (Gigabit G4, Digital Audio, Quicksilver and later) have a different power supply and motherboard that passes 28 Volts DC from the power supply to a connector for the ADC port graphics card. (28 VDC is passed to the Graphics card ADC port to power Apple's ADC monitors, introduced at the Summer 2000 MacWorld NY Show.)
| |
Step #1 – Find the right case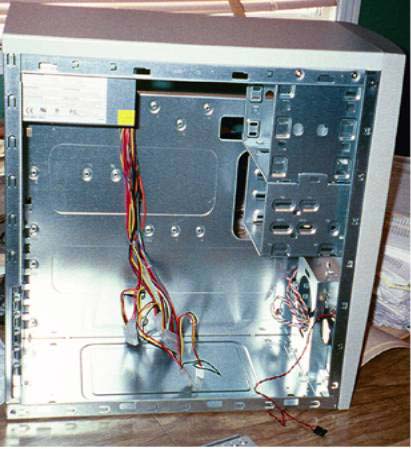 Figure 1 ATX case with power supply installed This was the case I chose to use. It was cheap and has fairly good expansion capabilities. I picked it up at my corner computer store for $50 (not bad at all). Now when you buy your case make sure you have lots of room for the Macintosh motherboard because they are different from their PC counterparts. I would recommend you take out your mother board from your Mac case first and measure it carefully, or measure it in the case, your choice, just make sure when you get the case your board will fit.
Step #2 – Drilling/Mounting MotherboardAll right this was the fun part. The Macintosh Motherboard is not ATX compatible so the holes that are pre-drilled and tapped on the case you have just bought will not work with your Mac board. You will need a good drill, a decent vacuum and good drill bits. Perhaps a tap and die set if you want to tap the holes you drill. Take your Motherboard out of your old case if you haven’t already done this. Now make sure you have at least one card in the expansion slot so as to get it lined up. I did not do this the first time and drilled the holes incorrectly. I couldn’t get in my expansion cards!  Figure 2 Test fitting an expansion card before drilling holes Now place the motherboard in the correct position in the case and mark the holes.
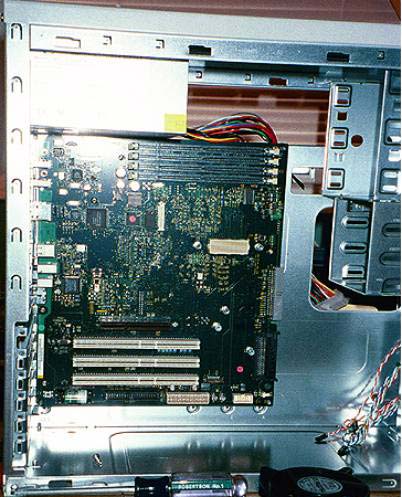 Figure 3 Correctly positioned motherboard Take out the motherboard and drill the marked holes out with a drill bit of the appropriate size. Now you have a choice of using the tap here and tapping out the holes or you could use a nut and bolt like I did. 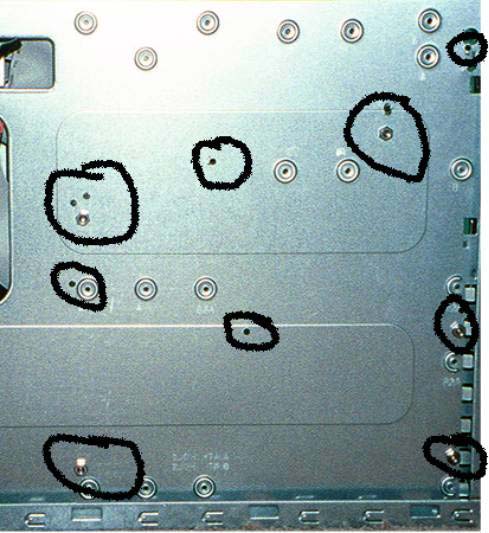 Figure 4 Holes drilled and nuts on. Notice a few “test” holes are present. I used the supplied, little, plastic, stand-offs that came with the case to keep the board away from the back of the case. This will also give you the correct offset from the back of the case for the expansion cards etc. The next page deals with the ATX Power Supply Connector.
| |
|
Intro | Page 2 | Page 3 | |
|
All brand or product names mentioned here are properties of their respective companies. Legal: Site Privacy and terms/conditions of use. |