(First report, 7/14/2014)
"2009 Mac Pro 12-core CPU Upgrade - Dual x5670 CPUs
(Mac Pro (4,1) updated to (unofficial) MacPro5,1 EFI for 6-core CPU support)
I finally got my nerve up to buy a matched pair of used X5670 2.93GHz CPUs. (Ref: Intel's X5670 specs.) I read everything I could find but so many things can go wrong.
I put in (2) 1mm nylon washers on each heatsink screw and slowly tightened them down first on processor A only. I had a problem POSTing (Power On Self Test), so when I looked closely at the processor under the heatsink I noticed it wasn't down cleanly on the socket. I replaced the second washers with one's half as thick and now it posted with the 3 sticks of ram. The fans on CPU A were at full speed and no matter what adjustments I made they stayed at full speed until I put in CPU B.
The fan speed was normal but I had red lights on the CPU board. I then made very slight adjustments to CPU heatsink A and the lights went out but when I checked my "about this Mac" it saw only the A CPU. I thought my B CPU was bad. After many more adjustments of B CPU heatsink it still would not POST. So I took out the second nylon washer on each screw and made slight equal tight and loosen adjustments and after several attempts it finally posted as a 12 core Mac with 24 gigs RAM.
I used a small mirror to look into the heatsinks and made sure the fans were spinning. If your heatsink fan connectors don't seat far enough down you will never post. Follow this guy's (youtube video) tips: "Mac Pro 2009 CPU upgrade 8 core Nehalem to 12 core Westmere".
I paid $370 for the Processors and now my Geek Bench is slightly over 26,000 - that's pretty much double my 2.26GHz 8-core.
The trick is not to panic when things go wrong. Be patient, it really works! I left out the obvious like tools, thermal paste and cleaning and prep. [MacPro 5,1 EFI update was already done.] Watch the youtube video of this guy and you will get there.
(he later wrote)
I also want to tell the readers that when your remove the glued down fan/temp wires (they are very fragile), take a very small flat head screwdriver and slide under the shrink wrap, slowly pulling up. These are points the youtube video doesn't make. Also unlike the video, do CPU A first because if you don't, you won't be able to tell which heatsink to tighten or how much. Once I got CPU A right and it seeing all my RAM, then I put in CPU B. Some will be lucky and it will work the first try.
-Mark"
Thanks Mark, appreciate the notes on problems you saw and what you did to solve them. (I know many owners won't go this far for a CPU upgrade but your notes and the video should be useful for those that are willing.)
And IIRC, the 2010 MacPro5,1 firmware also added support for audio over MDP as well as faster ram and 6-core CPUs.
(later report added 6/24/2015)
2009 Mac Pro -> 12-core 3.46GHz Upgrade - Dual Xeon X5690 CPUs
(FYI: X5690 specs 130W TDP. Apple's top config was dual X5670 (95W TDP).)
After reading, thinking about it, reading again then thinking some more I finally decided to upgrade the processors on my Early 2009 Mac Pro to dual 6-core 3.46 GHz Xeon X5690's. I had already upgraded the firmware (to the 5,1 version) a while ago and dropped in an Accelsior 960 GB PCI-e SSD (an amazing piece of gear in its own right). Geekbench 3 with this setup gave up an 18255 multi-core score. (I run a lot of extensions)
I began by checking the recommendations in this article (earlier report above) and the youtube video linked in it.
At the end of the video there's a link to detailed instructions at pindelski.org, which the comments will tell you have since been removed: pindelski.org/Photography/2013/07/08/mac-pro-2009-part-tbd/. Clicking the link will take you to an offer page where Mr. Pindelski strongly warns you against attempting this and tells you that he will do the upgrade on your Mac for a fee. Don't despair, though. The Wayback Machine will get you where you want to be will get a beautifully illustrated (Archived) guide to doing the upgrade (Link removed after Guide was pulled from Archive), much nicer than the video. Of course, neither Mr. Pindelski or I will be responsible if you damage your processor board while attempting the upgrade - if you're concerned, go back to the present day version of the page and let the pro do it.
Both processors POSTed on the first try. The Web instructions have you install CPU A first, then remove CPU B and after this test CPU A alone in the computer. I liked knowing I could boot with CPU A before installing CPU B, I think this would have made troubleshooting easier. I counted turns of the heat sink screws for CPU A but used the "finger tight plus 1/4 turn" method for CPU B. I'll order the 1333 Mhz memory upgrade today (didn't want to jinx myself). Geekbench 3 now shows a 31414 multi-core score.
I very much appreciate the work you've done over the years collecting all this info for us. Thank you.
Regards,
- JN"
Thank you.
(late posting this report from earlier in 2015.)
"12 core 3.46GHz (dual X5690's) upgrade for a 2009 Mac Pro 2.93GHz
I finally did it with 100% success. I had read and reread various accounts and finally did the deed. My instructions may seem sparse but then that is the way I approached the upgrade.
1) Upgrade from 4.1 to 5.1 (Netkas has the upgrader)
2) Remove heat sinks BUT count the number of turns to release each set of four screws. Mine averaged out to be 8.5 complete turns.
3) Remove the old CPUs, clean the old paste AND the old thermal pad which is at the side of each heat sink.
4) The fan four pin connector needs to be 'freed' of its mount in the heat sink. Slide the connector to the side (left or right I cannot remember) and push the connector back into the heat sink body, Remove the three tabs on the connector, free up the cable (carefully) that lies at the side of the heat sink then slide the connector back in place...it will dangle a bit which is needed.
5) Seat ONE new CPU (XEON X5690 SLBVX) in section A (we do one at a time), draw a line of thermal paste on the cpu, lay a strip of 5mm thermal pad to replace the old strip that you removed.
6) Now hover the heatsink in place BUT before you drop the heat sink down on the CPU you must ensure that the fan connector seats properly in the base connector...then drop (carefully) the heat sink in place (forget the washers...not needed).
7) With the allen key, secure the four bolts in a cross pattern. The number of turns required are exactly 4.5 turns LESS than it took to release the heat sink. (using CPUs with IHS, vs original CPUs without IHS.) In my case it was 8.5 to release thus only 4 turns were required to set the heatsink properly. I used the average of the eight bolts as they were close enough...and sometimes too much accuracy screws things up, especially the brain.
8) Make sure the memory sticks are in place and reinsert the cpu tray (with CPU A only) into the chassis.
9) Turn the machine on... white LED on steady, chime and boot up... my attempt was successful... wow.
10) Repeat 4 through 9 and Bob's your uncle.
I ran Geekbench3 and got a very satisfying 31,651
The very best description in some detail can be seen at - pindelski.org's web archive. (NOTE: Pindelski's archived guide has been pulled, so link removed.) Read this one last and you will only need to read it once then bring out the tools!
Good luck fellas,
Lyndon B."
(added 8/10/2015.)
"Upgrade 2009 Mac Pro Dual 2.26 Quad-cores (8 total cores) to Dual 3.46Ghz X5690 6-core (12 total cores).
I had applied the MacPro 5,1 EFI update last year, but had put the project on hold until a few weeks ago. I found an absolutely unbelievable price on a couple x5690 CPUs that turned out to be too good to be true. The CPU vendor cancelled my order stating the CPU's were out of stock.
Determined to finally finish this project I went ahead and ordered the CPUs from a vendor of CPUs for the Mac Pro upgrade market (don't know if you can publish it, but it was dncomputers.com). (Another report earlier this year (Dual 3GHz X5675 Upgrade and More) also bought CPUs with integrated heat spreader removed, but didn't mention the seller.) Initially I was going to follow instructions to install lidded CPU's, but this vendor sells delidded CPU and an install kit. That I assumed would make the install much easier, and by ordering direct, I saved money over their ebay price. Cost $605 and they even have a 3.06 12-core kit for $387, which I mention because that's very competitive with lidded CPUs.
Anyway, I was surprised to find out that I had many of the same issues as those doing lidded CPU installs.
I carefully removed the old CPUs, I installed the new ones being careful to apply new thermal paste to a clean CPU, I carefully positioned the CPU's and put the heat sinks flatly without movement. I tightened the screws down using an X pattern and thoughtfully and evenly.
But the first time I booted the computer, it recognized no ram on the second CPU. So I undid, the whole second CPU installation, cleaned everything off, and upon the second install it had recognized 3 of the 4 ram sticks. So I undid the whole second CPU installation again, and upon the third install it had recognized all 4 ram sticks.
At this point, the computer booted but seemed to me to be running hot and had more fan noise than I remembered.
Having installed the second CPU several times, I had the thermal paste exactly as I wanted it, so I decided to re-install the first CPU, redoing the thermal paste.
After that, I realized, I didn't exactly know what the CPU temps had been before, and I didn't exactly know what difference the upgrade had made. So I decided just to leave things as is.
Well this was part of a major upgrade to the computer, I also added an SSD drive and about a week later, a different graphics card. To my utter amazement, when I swapped out the graphics card, the computer became much quieter.
So I put back in the old graphics card, and sure enough - it was the graphics card fan that I was hearing. The new CPU's have not been causing any extra noise from extra CPU fan spinning, lol...I must have had the noise all along, but only started paying attention to it after my upgrade and special attention to noise afterwards.
I am happy that the CPU upgrade was a success. Since I added also an SSD drive and new graphics card, and a new 4k monitor running HiDPI mode- the computer feels like a brand new machine, the speedup is noticeable and unbelievable.
-Robert D."
(Added 5/26/2017)
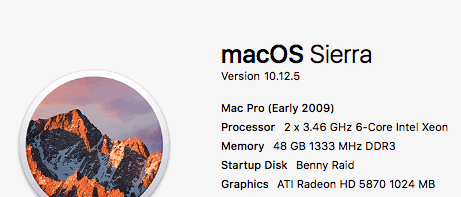
"2009 Mac Pro CPU Upgrade Using Mac Pro 5,1 EFI and 2 Xeon X5690 Westmere CPUs
(Mac Pro (4,1) updated to (unofficial) MacPro5,1 EFI for 6-core CPU support)
Another 2009 upgrade report to share. I'm running a Mac Pro tower with the 5,1 firmware flash. This Mac is faster then any of the new Macs.
List of upgrades:
Apricorn PCIe card with two Samsung 850 EVO 1TB SSDs in a RAID 0.
(Sustained transfer rate over 700 MB per second read/write.)
Two X5690's (ref: X5690 specs) with 48GB of server memory @1333MHz
Radeon 5870 video card
Sonnet PCIe Tempo SATA Pro 6Gb 4-Port
Sonnet PCIe Allegro™ Pro USB 3.0 4 port
Pioneer 209 Blu-Ray burner.
Total cost of this Mac in 2009 with Apple family discount was $2000. With ATI 5870 extra $350. (The 5870 bought later correct? 4870 was option in 2009, 5870 added in mid 2010 IIRC.) For a total of $2350, plus tax. (Wow, original early 2009 Dual 2.66GHz/6GB RAM/ATI 4870/640GB HD/Airport Extreme card US Retail was near $5,000 in March 2009.)
Apricorn PCI card was $130 and 2 Samsung 850EVO 1TB drives $225 each - total $580 from B&H Black Friday sale.
48 GB of server ram off Ebay for $77 (about 6 months back). Two Xeon X5690 CPU's for $200 off Ebay a few days back.
Sonnet cards about two years ago from B&H $250. Pioneer 209 $80 from B&H.
Everything is Rock solid and very stable.
Total upgrade cost of $1187.
- Benny."
Thanks Benny
Other Mac Pro Mods/Upgrade Articles:
For other articles on Mac Pros / Mac Pro upgrades, see the Mac Mods and Upgrades page.
| 