2006-2008 Mac Mini Core 2 Duo CPU Upgrades (Chip Swaps)
and EFI/Firmware Updates (mini 1,1 to 2,1) & OS X Lion on Core2Duo Updated Minis
First Posted: 2006
Reports last Updated: Dec. 16th, 2013
(FYI: This page covers 2006-2008 Mac Mini models with socketed CPUs. (CPUs in 2009 and later Mac Mini models are soldered to the motherboard.) The early Intel-based iMacs also had a socketed CPU and there are a couple C2D CPU upgrade reports here on those.)
This page has pre-2009 model Mac Mini owner comments on Core 2 Duo (and some Core Duo) CPU upgrades as the (2006-2008 mfg) Intel-CPU Mac Mini has a CPU socket on the logic board (as did early Intel-based iMacs).
Some reports include notes on updating mac mini 1,1 efi firmware/bootrom to mini 2,1 version for 3GB RAM support vs 2GB w/mini 1,1 - Guide to Flashing Mini 1,1 to 2,1 at forum.netkas.org/index.php/topic,874.msg15441.html)
There were several news page posts earlier in 2006 on Core Duo CPU swaps (before the Core 2 Duo), although they are not listed here, except for the one that included a step-by-step guide on Mini CPU swaps from May 2006 (2006 Mac Mini Intel CPU Upgrade Guide at www.o0o.it/mini/) and a later posted ifixit guide). A socketed CPU is a huge plus, although at some point future CPUs will not be compatible (and may use a different socket), but in the meantime it's a nice change to be able to use standard (high volume/commonly available) Intel CPUs for upgrades. (And over time, CPU Prices drop as intel releases faster/later models.)
Reader Reports: (later reports first.) If you've upgraded a Mini's CPU, send details (news at xlr8yourmac.com).
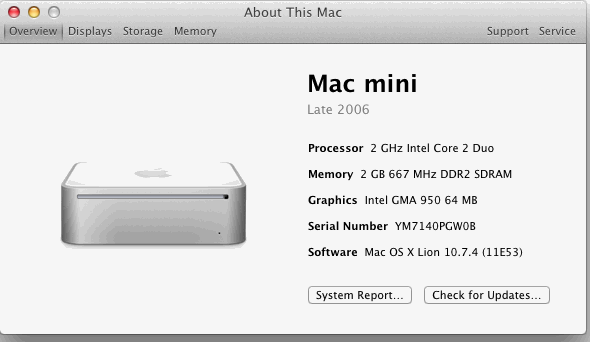
(Note/Tip on OS X 10.7 Upgrades: For owners that swapped in a Core 2 Duo CPU, the original tip for Lion dev previews is reported to still work - I.E. Install lion on a drive connected to a supported mac (Target Disk Mode, FW, etc) and then delete the (hidden) "/System/Library/CoreServices/PlatformSupport.plist" file. The Lion volume should then work with the Core2Duo updated Mini (or iMac). If there's an easier way (installer check edit, etc) send a note. TIA!
(Several reports below have notes on OS X Lion with C2D updated 2006-08 Minis. 5/15/2013 report has notes on ML/OS X 10.8.3)
2006 Mac Mini T7200 Core2Duo CPU/HD/Optical Drive Upgrades:
(from 12/13/2013 mail)
2006 Mini Core2Duo CPU upgrade report
I upgraded the CPU, RAM, HDD and the optical drive in a 2006 Mac Mini (originally 1.66GHz Core Solo) I bought to be used with a TV as a multimedia and web browsing machine. It's been 6 months and operated flawlessly.
I would recommend that people get all the parts together before opening up the Mini. The nylon screws that are available are definitely worth the $5 - you might be able to get away with not replacing the clips, but is it worth it for $5? Also, I would recommend reading around on the thermal paste and seeing which of the several recommended ones is available at the best price, I found the ubiquitous 'Arctic Silver' to be quite a bit more expensive than other brands which out perform it in testing.
The upgrade went smoothly. I upgraded to a T7200 2.0Ghz, 2GB of RAM, a SuperDrive from a '09 iMac (it can burn DL DVDs and cost $10 NOS) and a 1TB hard drive. If you plan on cloning your old hard drive onto the new one (as I did) then I recommend getting a firewire compatible caddy, as Snow Leopard doesn't always work with USB caddys when you try and format them for some reason - this problem held me up.
All in all, a very worthwhile exercise. I like my Mini so much I have bought a second one! This one is a 2007 and will also be upgraded - T7600 2.33 Ghz processor, 4GB of RAM (mini 2,1 EFI supports up to 3GB usable) and a bigger hard drive.
Many thanks for your site, I found it helpful. Good luck to all those who want to get the best out of their machines.
-Greg
Thanks Greg.
(Follow-Up) OS X Lion Install on Core 2 Duo Upgraded 2006 Mini:
(from 10/16/2013 mail - follow-up to previous C2D upgrade report)
I recently sent a report on upgrading the processors on two 2006 mac minis with hopes of installing 10.7 at a later date. (Sept. 26th post below) I finally was able to borrow an OS X 10.7 supported MacBook and installed 10.7 on an external hard drive. I had the external drive partitioned into 3 partitions.
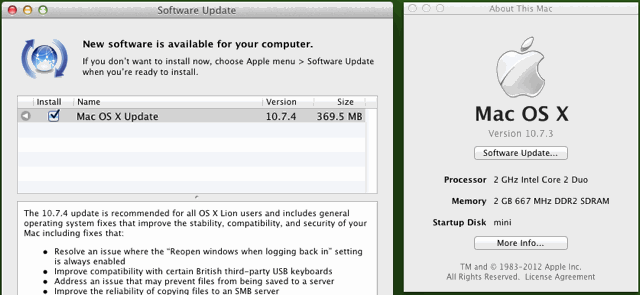
Partition 1 was used to install 10.7 and reboot the MacBook. This partition was then updated to 10.7.4. I did not install 10.7.5 as I had read that some mac mini systems did not like this update so I felt I would ignore it for now.
Partition 2 was used to create another install of 10.7 which was then used to create a disk image for cloning onto my mini without the platformsupport.plist. This was mainly for backup purposes in case I messed something up and could not get 10.7.4 or 10.7.5 working on the mini.
Partition 3 was used to install 10.7 and then apply combo update 10.7.4. This partition was then used to create a disk image that would then be cloned onto the mini's hard drive without the platformsupport.plist or any user accounts.
When it came time to install (copy) 10.7.4 to my upgraded 2.16 Ghz Core 2 Duo 2006 mini, I created a new partition to clone the 10.7.4 disk image onto. My original install of 10.6.8 is intact and can be booted into anytime for emergency if the 10.7.4 install ever stops working. After the image was restored to the new partition, I rebooted my mini holding down the option key to selected the new Lion partition. It booted up and I was greeted with the account setup screen.
Since this worked, I went ahead and installed the 10.7.5 combo update. This updated restored the platformsupport.plist, but I was able to remove it before restarting the mini. I am happy to say my mini booted up just fine and 10.7.5 is working well so far. Only complaint so far is the lack of scroll arrows in Lion.
I also found a non working 2006 1.5Ghz Core Solo that needed some TLC and would not power up. Turns out it had been opened up several times before and had hardware that was not seated correctly. Since I had an extra 1.83ghz Core 2 Duo CPU laying around I decided to upgrade the CPU. Replacing the CPU was fairly quick as this was my third time doing this type of upgrade. The pins released easily (Unlike my 1.66 Core Duo). I had a broken macbook with 2GB of memory laying around and installed it in this mini. Got everything put back together and pressed the power button. Got what I was hoping for, a startup chime and the display showed a folder with a question mark in it.
I then used the external drive to boot the mini with 10.7.5, formatted the internal hard drive and cloned 10.7.4 onto the internal drive and rebooted. Installed the 10.7.5 combo update, deleted the platformsupport.plist file and it happily rebooted and is now running 10.7.5.
-Nick"
Thanks for the follow-up Nick.
Core 2 Duo T7400 (2.16GHz) Swap:
(from 9/26/2013 mail)
Installed a used 1.83Ghz Core 2 Duo T5600 in my wife's Mac Mini Core Solo and upgraded the RAM to 2.0GB. The hardrive in the mini crashed and I figured it would be a good time to install the T5600 in it. Was able to remove the pins easily and reuse them. Had a fun time doing the upgrade.
Today I upgraded my Mac Mini Early 2006 1.66GHz Core Duo to a used 2.16GHz Core 2 Duo T7400. This mini was already upgraded to 2.0GB of RAM. I had a difficult time getting the pins out of this Mini. My wife's Mini made me wonder why people were having problems getting the pins out. Well, my Mini let me know. Took 10 minutes to get one pin out as one side kept expanding when I tried to push the pin through the CPU hole.
Both Mac Mini Systems are running Mac OS 10.6.8. I plan to install 10.7 on the 2.16GHz machine just to see if I can get it to work. I did upgrade the firmware so the machines are identified as Macmini 2,1. I found a couple programs that do not run if the mini was still showing Macmini 1,1.
Temperatures run about 66°C when the systems are just being used to browse the net and watch Netflix. When running BONIC the CPU cores go up to 86°C. Temperatures are close to what they were before the upgrade, the T7400 runs about 10°C cooler than the older T2300 when idle or browsing.
Thank you for all the great information.
-Nick H.
"
Thank you Nick.
2006 Mini Core 2 Duo (T7600/2.33GHz) CPU Swap, Mini 2,1 EFI Update: (with source for heatsink retaining pins)
(from 8/5/2013 mail)
Thank you for the possibility to share experience on Mac mini upgrades! The comments on your website (this page) and the article at ifixit (Replacing mini Model A1176 Core 2 Duo Processor) are very helpful and I was able to upgrade my Model 1176 CPU to T7600 (2.33GHz), firmware to 2,1 and RAM to 4 GB (3GB usable w/2,1 rom vs 2GB w/1,1 rom) without big problems. Alas, the Mobile Intel 945 Express chipset limit of 4 GB leads to only 3 GB usable by the operating system. As to Lion, it's hard to find a second Mac here to upgrade to it.
On dismantlement of the CPU heat sink, I broke one of the plastic pins. (They're probably not designed to be used multiple times anyway.) As plastic screws are very hard to find here, I used 25-mm-long M3 metal screws instead. To prevent short circuits on the back side of the PCB, I put the heads of the screws through washers made of thick paper, taken from old light switch covers and AC power plugs. (Or Nylon washers. Hardware Stores usually have them, as well as nylon screws.-M.)
Turning the nuts on the top side of the heat sink, I adjusted the length (and hence the tension) of the springs to be about the same as if the original pins were used. The thermal compound I applied was Arctic MX-4. The CPU temperature after the upgrade is several degrees Celsius higher than before it, but this may be normal as the new CPU is more powerful. The temperature can be lowered by the so-called "undervolting".
But it turned out that there are replacement pins (not the same as the original ones but very close) made by RichCo and called "HSR-2" (which stands for Heat Sink Rivets, model 2 - you can see the HSR-2 drawing available from there). (Update: as of 2014 page 404'd, so link removed.)
They're sold by Digi-Key: www.digikey.com/product-detail/en/HSR-2/HSR-2-ND/3812032
You may want to make this information available on your site. I think that it may be useful to others.
Best regards,
Luchezar G."
Thank you. (Not sure what their minimum order/qty is, but readers may also want to check any local parts stores perhaps. Granted may be a longshot with the way things are going to find these at stores like Radio Shack, but if you still have the spring, I've seen a selection of plastic retaining pins at some hardware stores. They also had a selection of nylon screws/nuts.)
2006 Mini Core 2 Duo Swap, Mini 2,1 EFI Update, OS X Mountain Lion:
(our first report on OS X 10.8.x on a C2D upgraded 2006 mini, although some prev. reports on OS X 10.7.x.)
(from 5/15/2013 mail)
"2006 Mac Mini Core2Duo CPU Upgrade
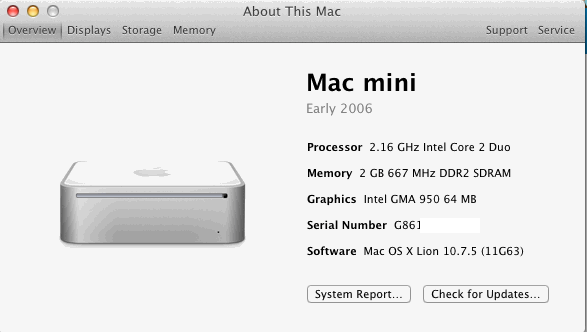
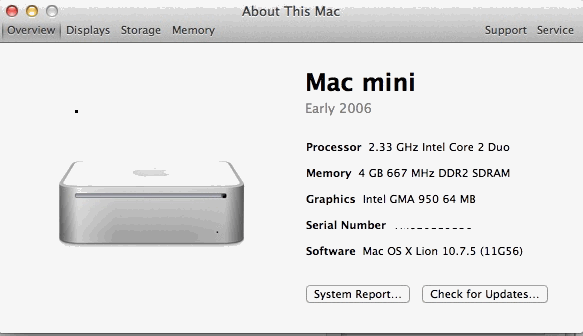
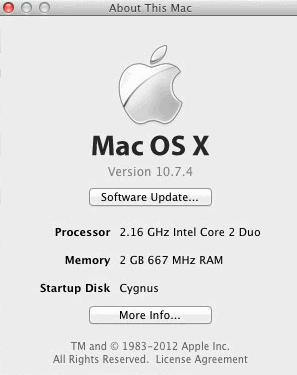
Before: 1.83Ghz (T5600) - EFI 1,1 - 1GB memory - OS X 10.6.8
After: 2.0Ghz (T7200) - EFI 2,1 - 2GB memory - OS X 10.8.3
(EFI 2,1 minis can address up to 3GB max with two 2GB dimms installed)
Hardware exchanges went fine; got lucky and no broken pins on heatsink.
Had no firewire lead to do target mode so created a partition on a mountain lion MBP, installed lion and used Carbon Copy Cloner to copy to new partition on the mini via usb.
Navigated to Lion partition from SL and deleted platformsupport.plist and was then able to boot into Lion.
Used MLPostFactor 0.2.2 (available tonymacx64.blogspot.com/2013/04/guide-mlpostfactor-install-108-on-old.html, see notes on bugs/issues) to upgrade to Mountain Lion 10.8.3.
All runs great apart from no internal sound, but using external audio interface so no problem.
Thanks for all previous posts.
Total cost under £ 50 (UK)
-Paul R."
Is Lion/MLion (with 2GB Ram) really worth it vs OS X 10.6.8? (I've not used MLion much. Main work mac has 10.6.8.)
T7600 2.33GHz Core 2 Duo, SSD, RAM Upgrades:
(added 3/26/2013)
"T7600 (2.33GHz) upgrade (and more) on mac mini. Thanks to your site I made the leap and did the upgrade(s).
I did the following for about $180 (total):
Swapped a 1.83 GHz C2D (T5600) for a 2.33 GHz C2D (T7600)
I used the original nylon pins that I was able to extract by being careful and turning the motherboard on its side and gently squeezing the head of the pin and pushing it out. Also, I used artic paste between the chip and the heat sink. I paid about $70 via ebay. I called up the seller after googling the shop name and negotiated it for a slight discount over the buy it now price. I felt the T7600 was worth an extra 40 bucks over the T7200/7400.
Swapped original 80GB HD for a Kingston V300 128 GB SSD
The hard drive swap was basic. The Kingston was only about $70 or so through a promo at Staples. I simply used Carbon Copy Cloner and cloned the old drive, tested it in my mac (2.5 HD enclosure came with the SSD), and installed it. As a bonus, I have the 80 GB drive as an offsite, encrypted backup for can't lose docs and pics.
Swapped the 2GB RAM upgrade for 4GB
The RAM cost $38 for new RAM via an ebay vendor. I had no idea how expensive the RAM was for 667 mhz now. Ouch! It was an easy swap. (With mac mini 2,1 bootrom up to 3GB ram usable vs 2GB max w/mini 1,1 rom)
The whole project took me about 3.5 to 4 hours. It would have taken less but one of the pins holding the heat sink to the cpu popped when I installed it. I spent at least 30 minutes looking for it on the floor. I finally found it on top of the curtains! My skill set is novice at best but I considered the ifixit guides clear enough to make this possible for anyone who cut their teeth on legos.
This thing works fine, though the fan turns on when I am pushing it - think transcoding to 720 and 1080 (video) for Plex - but has taken all I have given it. It currently acts as the media server and main computer for our kids. This has given a new lease to the old mac. When my wife gets some replacement software we intend to upgrade from Snow Leopard to Lion on this machine.
-Peter S."
Glad it worked out, and thanks for sharing.
Another (under $50) 2006 Mini T7200 2GHz Core 2 Duo Upgrade:
(added 1/14/2013)
"Mac mini 2006 upgrade successful. I've been running an upgraded Mac mini with a $40 2Ghz chip I got on eBay for months now. Been using it with lion because I wanted icloud and back to my Mac to function, which has been great because I can control it from anywhere. Couldnt do this with snow leopard since mobileme went away. I use it as a central iTunes home share, time machine backups for other wifi connected laptops, and file server I can access from outside the home. It runs headless andi use screen sharing to control it from any Mac I use anywhere.
I had some difficulties with the nylon pins, I broke two of them and had to sacrifice one from the other heat sink to get the job done. That seems to work out just fine though I installed termprature monitor just in case. I rarely hit above 70 degrees unless I'm doing something really intensive and then smcFanControl at max keeps it down.
I am still running 10.7.1. All I really needed was icloud so there's no big reason for me to upgrade although the reports of people upgrading and successfully removing the plist are giving me some confidence to do it anyway.
-Ian"
Another 2006 Mini T7200 2GHz Core 2 Duo + EFI 2,1 Upgrade:
(added 1/7/2013)
"Thanks to your helpful instructions, I've been making progress on a late-2006 mac mini upgrade. It started with a CoreDuo 1.66GHz and have just replaced with a Core2Duo 2GHz (T7200) that I bought on eBay for $25 (the higher clock speeds were significantly more expensive).
I managed to break one of the plastic heat-sink standoff pins but ended up just replacing all four of them with 1" steel 4-40 socket head cap screws that I had lying around. I put the screw up through the motherboard and used a 4-40 nut to tighten each spring down to approx the same tension as the standoff pins. This doesn't appear to short anything out, as long as your screw head is not too wide. I guess it might be conducting some more heat to the motherboard than the plastic version, but TemperatureMonitor readings all seem fine.
Anyway, so far so good, it gets a GeekBench score of about 2700 compared to 2000 originally.
I've also just done the firmware update from 1,1 to 2,1 which was painless. I've ordered 2x2Gb memory to replace the 2x1Gb that I've got in there now, so that should help on the performance side as well.
I'm stuck on the Lion upgrade process - I haven't had any success in getting Lion installation media from Apple (they keep redirecting me to other things), and seems very expensive to buy USB installer keys on eBay - why?? - so it's hard to follow the recipes I see online. I do have a MBP running Lion and can get into RecoveryMode, so I'm hopeful that I can find some way to use that to upgrade my mini's current 10.6 installation to 10.7, preferably keeping all my user files intact. Not sure I have a firewire cable, but do have an 8Gb USB stick. If anyone has any hints, please let me know!
Cheers, Patrick"
I can't help with that, sorry, but I'd ask yourself if there's really anything you need in OS X Lion. (Which may use even more ram/run slower (or worse) on your Mini than 10.6.x.) OS X 10.6.x also has Rosetta (optional install) which some find useful.
(Patrick later wrote
"A brief update - memory upgrade seemed to make a marginal improvement to GeekBench score (now about 2800).
I wanted Lion to get iCloud support since my Mini is my central iPhone/Pod/Pad syncing spot (plus all my other Macs are running it). After messing around with a USB flash drive with the Lion Recovery Disk (which boots after plist removal but disallows the auto-download of Lion because the target Mini is ineligible/unregistered), I ended up just using target disk mode. Boot MBP with Lion in Recovery Mode, connect firewire to Mini, boot it in target disk mode, do Lion install onto it. The MBP auto-reboots during the install and when it's done just reboot again into its normal startup disk but leave Mini in Target Disk mode to delete the single PlatformSupport.plist as you note. I was slightly worried since some reports suggested you needed to mess around with parts of the installer package as well but maybe that's just to get the Mini to run the installer. Anyway, all working fine and all existing files preserved even after a software update (though not one requiring a restart).
Thanks, Patrick"
Another 2006 Mac Mini Core 2 Duo CPU Upgrade:
(added 11/20/2012)
This is just a quick note to report a successful cpu swap on a mac mini.
It went from a T2400 (1.83GHz Core Duo) to a T5600 (Core2 Duo 1.83GHz), with a simple chip replacement. With only 2 GB of ram, using the mini as a simple media center, I did not see any need for upgrading the firmware, for the 3 GB (vs 2GB) memory management.
Regarding the hardware upgrade, I cannot stress enough hom fragile those nylon pins that hold down the heat sink are. I broke one and had to improvise, since in Brussels, on a Sunday, you will find absolutely nothing opened to buy parts.
The cpu replacement is part of an "Overhaul" on this mac; in a few hours it will most likely have 10.7 installed (officially purchased from Apple, using the 0800 number, and politely explaining that I needed Lion because I had an old mac). I am installing 10.7 on my external disk, as we "speak".)
My Mac OS is version 10.7.5, NATIVE from the installation file. I am not very sure how it will behave, regarding the plist files. We shall see. (As noted here earlier - even with a (reqd) Core2Duo CPU, 10.7 will not boot from an original core-duo CPU Mini due to the mac model ID check in the supported models plist file. Workarounds used were either deleting the plist file or editing it for the unsupported mini model ID.)
Thank you for the comphensive guide.
-Carlos C."
Let me know how it goes, but again you'll have to take care of the supported macs plist issue first or 10.7 won't boot.
(Personally if I had an 06 Mini I'd stay with 10.6.x as I don't really need 10.7's features myself (but realize 10.6.x isn't updated anymore). However I would still want all the ram support possible (especially with later OS's) although there's always some risk with firmware updates.)
Another 2006 Mac Mini EFI Update (to mini 2,1) and OS X Lion Upgrade:
(added 11/19/2012)
"Just an update since I installed the Core2 Duo CPU chip March 21, 2011 (original report below). Yesterday I decided to give OS X Lion a try. Installing the firmware update was a piece of cake. (guide linked above)
I was planning on installing Lion onto a USB stick when I realized that I had a Firewire 800 to FireWire 400 cable. Connected the mini to my Imac and loaded the Mini into Target Mode. I had purchased Lion from the app store when it came out. So all I needed to do was go back to the app store and download it again for free. A very easy and simple install. Took about 2 hours to migrate my user info from my Mini's Snow Leopard partition to my new Lion partition. Once that was completed, I rebooted into Snow Leopard, deleted the PlatformSupport.plist file and there ya go. I have 10.7.5 running flawlessly on my 6 year old mini. I plan on bumping the Ram to 4 GB and my mini will continue running my home automation setup.
-Lee M."
Another 2006 Mac Mini Core2Duo CPU/RAM/EFI/Lion Upgrade:
(added 11/16/2012)
I want to give a brief report about upgrading my Mac Mini following instructions here. As the hard disc of the mini was almost full I had to upgrade that and decided to upgrade the CPU and RAM as well to allow installation of OS X 10.7 Lion to have security updates again.
I had already opened the case and removed the internal frame before so those operations were not new (neither is the look of my mini's underside ;-). The Logic Board removal was straightforward as well and I managed to pinch the plastic screws just enough to squeeze them through the board keeping them intact for reassembly. Swapping the 1.67 GHz Core Duo for a T7400 2.16 GHz Core 2 Duo was rather easy. (I chose the T7400 rather than the faster T7600 because of the huge price difference on EBay (60 EUR compared to 100+).
I scraped the thermal compound off the heatsink with a small blade and cleaned it with alcohol. I applied Arctic Silver which accounted for about 10% of the cost of the swap and felt like overdoing it (considering the low TDP of the CPU) but what's the alternative when you don't want to wait for parts?
Re-assembly was easy but the mini would not even switch on thereafter. Fearing I had bricked it took me at least half an hour of scrutinising all parts, disassembing and re-assembling to realise that the failure to boot up was not due to any faults or omissions during reassembly but rather caused by one of the power button wires ripped from the small circuit board behind the button. As I did not come up with any other way of accessing the solder points I bent the metal RF shield away from the back side of the bottom housing just far enough to be able to solder the cable back on. (The metal screen seems to be "fused" to the rear part of the computer by small plastic studs that break when the screen is pulled off.)
The firmware update worked but I had to press the power button until the progress bar started to appear (just waiting for the flashing light wasn't long enough).
I briefly considered an SSD but then went for a plain vanilla drive left over from a Macbook upgrade. (Using a 120GB SSD seemed pointless as the whole exercise had started with the 120GB HD being too small and shelling out 200 EUR for a 256GB SSD just did not seem right as the uprade would have been more expensive than the resulting mini would be worth. I installed Lion on the drive and added the "Mac-F4208EC8" system string to platformsupport.plist. This was even easier than in the guide as I just opened that file with the default app (PLIST editor). (Had to change the permissions on the CoreServices parent folder to be able to save, though.) [After changing any system file it's often a good idea to repair permissions (Disk Utility) afterwards.]
After successfully booting to Lion I removed the internal frame yet again to put in the new RAM. After another successful boot it was time to run a Software Update and migrate the data from the old Imac. (This took ages via USB). I kept the old drive attached via USB to allow booting the old system to to the PLIST changes until the whole upgrade was done.)
No long-term experiences yet, of course. Thanks for providing step-by-step instructions!
Regards, Siegfried L."
All Thanks go to the readers that have shared their experiences and tips.
Another 2006 Mini CPU Upgrade (2GHz T7200 Core 2 Duo):
(added 10/18/2012)
"Many thanks for these postings, they helped me tremendously during my upgrade. Configuration:
1) Original:
Mac Mini early 2006 Core Solo 1.5 GHz; 80GB HD; 2 GB RAM (previously upgraded from 512 MB); OS X 10.5
2) Upgraded:
Installed T7200 (2GHz core 2 duo) CPU and 500GB Seagate Momentus XT hybrid HD; OS X 10.6
Notes:
Heat sink nylon bolts from eBay (ends Oct 24, 2012 05:26:08 SGT).
(you may find similar screws in some hardware stores but stock/selection varies)
Definitely need a 3rd hand when installing the heatsink.
Pre-installed Snow Leopard on the Momentus XT (in SATA case) before replacing the HDD internally. Mini booted up without any problem.
Replaced thermal pad on bottom housing with Thermagon 600 series, T-Flex 6100 (boron nitride in silicone elastomer). Chanced upon this thermal gap filler in eBay, brand new - was part of liquation stock, 5 pieces for about $5, self cut to size to replace original Apple thermal pad. Upgraded Mini was on for over 1 hour with no issues. Downloaded SMC Fan Control 2.2.2 to monitor CPU temperature.
Did not upgrade firmware due to not familiar with process. (Guide on Mini 1,1 to 2,1 EFI linked above.) Mini runs much quicker, probably explore firmware update later as no need for installing Lion.
T7200 CPU was used and bought from eBay at $40.
-- Sim T"
More Updated Mini owner Reports on OS X 10.7.5:
Despite some earlier reports (ref: Sept 21st, below) of OS X 10.7.5 working after deleting the supported models plist file (again) - here's some recent problem reports from readers that updated their (modified) 2006 minis from OS X 10.7.4 to 10.7.5. (2 of these 3 later got 10.7.5 working)
(added 9/27/2012, See below for follow-up)
"late 2006 mac mini - core2duo and 10.7.5 (problems)
i'm wondering if this can be posted as i'm looking for some advice...seems that other readers have
gotten this to work, but it doesn't seem to be working for me. here's what i've done.
1. have a 2006 mac mini with a 2ghz T7200
2. have the EFI firmware upgraded (mini 2,1)
3. it's running 10.7.4 and has been for months
4. used super-duper to clone the internal hard drive to an external fw drive
5. rebooted using the external fw drive
6. installed the 10.7.5 client update on the external fw drive
7. rebooted into the internal hard drive (10.7.4)
8. removed the PlatformSupport.plist on the external fw drive
9. rebooted using the external fw drive (10.7.5 minus the PlatformSupport.plist file)
10. the mini starts up to the apple logo and the spinning icon underneath, then after a few minutes, the icon goes away and the computer stays stuck at the apple logo.
my only choice after waiting about 20 minutes is to reboot into the internal hard drive
running 10.7.4. (restart w/Option key down at power-up should allow choices)
any thoughts on what i could do differently to get this to run with 10.7.5?
thanks, pete"
If the plist file is really deleted, not sure what to suggest/why others were OK based on earlier reports. Unless apple revised something? Or differences in SU vs Delta or combo? (Normally reinstalling a combo update is the old tip for update problems at least with supported macs. Sometimes 3rd party drivers/addons also cause problems.) Perhaps some other mini owners that reported 10.7.5 updates working earlier (below) can suggest something. (Question - tried zapping the pram? DU Volume verify/check OK?)
Update: Here's a later follow-up from Pete:
"I managed to get this working... I re-applied the combo update and removed the plist file and it still didn't work, so as a last resort I started in safe boot mode and it booted.
(Here's Apple's doc on Starting up in Safe Mode. Safe boot also does a dir check/fsck IIRC.)
So I re-booted without doing anything else and it started up and ran... I've since rebooted a couple of times to make sure everything is still functioning.So, it would seem that the safe boot did the trick (that said, at some point in the process I also reset pram and reset the smc on the mini too).
-pete"
(added 9/27/2012 - updated 9/28)
"
Your readers may wish to postpone the 10.7.5 update. I let OS X apply
the 10.7.5 update last night and, as with earlier updates, OS X won't
boot. I assume this is because PlatformSupport.plist got restored by the
update, but have yet to prove this. (That plist file is restored as reported last week (9/21) below)
Although I kept my USB installer from June (see 6/11/2012 report), this time the Mac won't boot from it. I'll do some tinkering over the weekend and let you know what I
find out.
(9/28 Update/Follow-Up (working now))
Well, that was odd. I borrowed a spare Mac to recreate the 10.7 USB installer, deleted PlatformSupport.plist from the USB stick, then successfully booted my own Mac Mini from it. I don't know why it wouldn't boot from USB earlier.
Sure enough, 10.7.5 had restored /System/Library/CoreServices/PlatformSupport.plist. I deleted it, just like before, and this time 10.7.5 booted successfully from the internal hard disk. I'm at a loss to explain why it worked tonight but not last night.
Regards, Alex"
(added 9/27/2012)
"The 10.7.5 delta update is proving to be the most problematic so far for me and my mini. Here's my config:
Original Config:
- Macmini1,1
- 1.5 GHz Core Solo
- 512 MB RAM
- 60 GB HD
Current:
- 2.33 GHz Core2 Duo
- 2 GB RAM
- 128 GB SSD SATA
- Lion Server installed
Note that I have NOT updated my firmware (mini 1,1 to 2,1) to fool the mini into addressing 3 GB of RAM.
OS X 10.7.0-10.7.4 all ran fine, with having to remove the PlatformSupport.plist again when 10.7.2 replaced it, as others reported back then.
10.7.5 (with the server update), however, hosed the machine, and removing the PlatformSupport.plist DOES NOT rectify the problem. The machine still boots with a Do-Not-Enter symbol, and Verbose Mode reports that F4208EC8 is not supported. This is most puzzling, because the plist has been removed. I've also tried reinstating an edited plist with the model in there to no avail.
I'm considering restoring back to 10.7.4 and then updating the firmware, but I'd like to avoid that if possible as I don't really have any pressing reason (no RAM needs) other than possibly ensuring 10.7.5 compatibility, and I'd rather not risk bricking the machine entirely. Any ideas/help?
Kindest regards, Rafi"
(added 9/24/2012)
"Just Updated and Thank you! First, Thanks for the website. Its an amazing resource and I make a point to visit it daily. I have a early 2006 Mac Mini that was showing its age.
To get things started I went to ebay and picked up a 2GHz Core 2 Duo T7200 CPU for $25. CPU swap was easy thanks to your upgrade guide. Luckily I also picked up a set of the Nylon bolts from the local hardware store prior to the upgrade. I did break one of the heat sink mounts.
I paid a visit to the local Comp Usa store a bought a Samsung Sata III 128 GB solid state drive. I mounted the drive (temporarily) into my OWC Mini Stack case. Then connected the drive to my Macbook Pro via firewire 800 and installed Lion directly to it. While connected I also applied all updates, installed iLife '11 and Office 2011. I removed the "/System/Library/CoreServices/PlatformSupport.plist" file and then installed the drive into the Mac Mini. The Mac Mini booted right up after a brief question mark. (startup disk search) To eliminate the question mark I updated the System Preferences Startup Disk to select the new drive.
The system boots in about 17 seconds and applications launch in less than two doc bounces. Scrolling in iTunes and websites are smooth. Right now I have 2gb of ram in the computer but I'm going to pick up some more memory and try to upgrade the system (EFI firmware) to version 2,1.
(referring to the unofficial Mini 1,1 to 2,1 EFI updater for 3GB usable ram vs 2GB with mini 1,1 firmware. Earlier posts/links on that below.)
My Macbook Pro is running Mountain Lion. I used Lion Diskmaker to create an Lion Boot SD card, that I used to install Lion on the SSD.
-Jerry"
Follow-up from C2D Upgraded Mini owner on OS X 10.7.5 Update:
(Follow-up to his 5/11/2012 report here on 2.33GHz (T7600) Core2 Duo/EFI Firmware Upgrade (to mini 2,1) and earlier OS X Lion install.)
(added 9/21/2012)
"I just upgraded my 2006 Mac Mini from Software Update from OS X 10.7.4 to 10.7.5 -- and did again have to delete the .plist compatibility file. Not sure why Apple restored it yet again this far into 10.7.
Otherwise, all is well on 10.7.5.
-TP"
Thanks for the follow-up. From the comment I assume you used the 10.7.5 delta upgrade?
(If so, try the 10.7.5 Combo updater.) Combo Updates are more likely to reinstall plist but even deltas may do so sometimes. Best to be prepared regardless. (As noted before, the default/standard Lion supported models plist does not include 2006/7 minis (mini 1,1 and 2,1) and must be deleted (or edited) for Lion to run on those models even when the CPU is upgraded to a Core2Duo.)
Other Replies the OS X 10.7.5 update/Supported Macs Plist:
(Update: Some later reports from Sept. 27th above on 10.7.5 noted problems)
"Thanks for the tip...
Just removed the PlatformSupport.plist after 10.7.5 update.
Booted from OS X install disc/drive and used Terminal...
Mac mini (C2D), 1TB 7200rpm upgrade, 3GB RAM.
-E"
"Re: OS X 10.7.5 supported macs .plist file restore
...forgive me for not sharing it earlier, I updated my CPU/EFI upgraded mini to Mac OS X 10.7.5 and checked for the support .plist file inside System/Library/CoreServices before restarting, just to be sure and avoid having to delete it from target disk mode with another Mac. Well, I was surprised to discover that it was indeed there after the previous updates did not restore it.
I used the combo update as usual and after rebooting normally, the machine went hot (93 °C) and fan-loud-crazy (5000rpm) for a couple of minutes before cooling back to normal temp/rpm (55 °C/1500rpm).
As with previous updates, Activity Monitor revealed to be mdsworker doing its stuff choking both cores. I wonder why this happens with this Mac only after the CPU/EFI upgrade with "unsupported" updated Lion and nobody else in your reports seem to experience similar issues. Maybe they do but are not as aware or do not notice it.
-Barton"
I welcome replies to the above question from other mini owners. (Some later 10.7.5 reports above noted problems)
2GHz Core 2 Duo (T7200) swap in a "Salvaged" 2006 mini:
(added 7/10/2012)
"Early 2006 mac mini, saved from a graveyard for $150
Started off with a 1.5Ghz intel core solo, no hard drive, CDRW and 1GB RAM
First upgrade, swapped in a core 2 duo 2.0Ghz (tried multiple CPUs till found one that worked), added a 250GB hard drive (will it see a 500GB? (Yes, onboard sata has big drive support for much higher capacity. Also check drive heights before buying, as I think your model mini's max is 9.5mm high, but there are 1TB 9.5mm high notebook drives.), upgraded to 2GB RAM, running OS X 10.6 have yet to try 10.7. Purchased the nylon bolts/washers for the heatsink (no local shops had them) mentioned in other post, on amazon due to my possibly breaking one or two of the per-exisiting screws provided, I blame shoddy craftsmanship for that, and losing a spring (modified a bolt to work with no spring, spring found later).
Second upgrade (the previous might count as multiple upgrades I guess but I count it in stages), swapped CDRW for a DVD-RW pulled from an imac.
Third upgrade BD-RE Blu-ray player/DVD burner, pulled from a sony vaio all in one, need to try out different blu-ray playing software, any suggestions? Drive reads BRD fine, need player if this is to be a media box. (There have been some "Mac" blu-ray player apps, but IIRC required an internet connection) BUT it required a network connection to play Blu-Ray movies (for DRM/decrypt I assume), which is a non-starter for me personally. I've not kept up with VLC media player for a long time but maybe someone else can better answer this question. I only watch Blu-Ray's on a home player/TV. There's some media center software for Macs (XBMC, Plex, maybe others) especially for those that like 'non disc' media. Again I'm not the best person to ask about that, sorry. I had linked to a reader's core solo Mini Media Center project page years ago but it was a .Mac website and is now 404. Try googling on the subject.)
Fan is loud, has less then a 10 second boot to desktop, seems to be running good. Might heat be an issue? I could probably find/modify an all copper heatsink to fit it if need be, not sure how touchy these are on heat.
(I assume CPU/HS mating/surfaces OK (and thermal cmpd not overdone, etc)? And I'd see what (freeware)
Temperature Monitor reports on your system.)
Thanks for the tips, and good modding to you all.
-Wayticus"
Thanks for the feedback. (And maybe some other early mini owners can chime in on maxing out their internal storage and/or Media Center software, etc.)
Follow-Up to Earlier Report w/Notes on Lion Install/Temperature/Fan Speeds:
(added 6/22/2012)
"I thought you'd like to know the update on my "2006 Mini Core 2 Duo T5600 1.83GHz Upgrade report (of 5/29/2012) where I left the affairs at OS X 10.6.8 after the CPU/EFI upgrade. I refused to upgrade to Lion because the USB 10.7 Lion drive used to boot/test the mini caused some odd behaviors with the temperature, fan speed and percentage of core activity.
After some evaluation and further observation I found that it was caused by "mdworker" in Activity Monitor (using as much as 100% of the new CPU). This had to to with Spotlight indexing and some other optimizations that the kernel does with every fresh Mac OS X installation. Suffice to say the once all tasks completed, the CPU cores settled down and so did the temperature and respective fan speed (now 8°C less than running Snow Leopard!). I'm impressed with the cooling efficiency of Lion vs. Snow Leopard.
So I backed up the data to a Time Capsule before erasing the internal drive. Booted back to the USB external drive, then I proceeded to use Carbon Copy Cloner to mirror the external USB drive -to the internal HDD- (which had a current up to date version of Mac OS X 10.7 Lion minus the PlatformSupport.plist file previously removed for the boot test). The mini booted back perfectly without issues, also reporting the same temperature readings as with the external drive once "mdworker" finished doing its thing. Restored all Files & Apps using the Time Machine previously mentioned and everything went back to normal.
How much did I spend on all this? less than 50$ including the T5600 CPU, thermal paste and the dreaded plastic pins to replace the ones I broke disassembling the CPU heat-sink. Worth every penny. I'll add an SSD and see if I can get the RAM pass the 2GB limit... when I get around it.
Thanks, I would not have done this if not because of your very informative report section on this helpful site.
-Barton"
Thank you, and all readers that have shared their experiences here.
2006 Mini updated w/Core2Dup CPU, Mini 2,1 firmware: (from a reader in the UK)
(added 6/22/2012)
"Upgrading 2006 mac mini (aka "the thief of time")
As my MBP 2008 left me without a word of goodbye, my "quick fix" to access a word doc(x) on a QNAP backup was to upgrade daughter's 2006 birthday present and make it worthy of more than a doorstop. Trouble was it wouldn't run new version of word so I couldn't open the document. And, thanks to this page, so it began...( my first mission...)
Upgraded firmware to 2.1. (Mini 1,1 to 2,1 - Ref: http://forum.netkas.org/index.php/topic,874.105.html), upgraded 512 MB of RAM to 2x2GB SODIMM "unbuffered" as instructed (for £ 30, UK) and installed it thanks to OWC install videos - (I'm confused by the "recognition of only 3GB" comments I found - mine seems to recognise 4GB. Is that because I upgraded the firmware first or am I missing something?)
(Some previous reports/screenshots noted 4GB is shown/recognized (About info, ASP listing) but only 3GB IIRC is actually usable/addressable - Even with a native Mini 2,1 system. (System memory map related I assume.)
Older posts years ago and mac upgrade vendors have also listed that limitation. Here's a clip from a past post:)
2007 & 2008 mini (mini 2,1)
*Apple factory spec 2.0GB max, OWC tested to support 3.0GB RAM max.
4.0GB can be installed, but only 3.0GB will be addressed.
Upgraded OS X from Tiger to Snow Leopard and got to 10.6.8.
Then thought an SSD would be nice. Got a OCZ 80GB Vertex II installed thanks again to OWC install videos.... Problem that it was SATA 2 and although supposedly "backwards compatible" to SATA 1 - it wasn't - without a firmware upgrade (didn't work this out until installs from TimeMachine loaded up and then apps started dropping out).
To do the SSD firmware upgrade, had to remove the SSD, reinstall the old HDD and burn a boot disk with the new firmware using the mini (our only writable disk drive) and then boot (update?) the ssd off the disk. Per this www.ocztechnologyforum.com/forum/showthread.php?95716-Vertex-Plus-firmware-3-55.
After this it went like a rocket. Installed office for mac 2011 (original purpose lost in the mists of time!...).
So... all's well that end's well.
Or no...
Then decided to upgrade cpu and get to lion to access a TM backup...so just put in a T7600 C2D (at Ebay UK auction). Lovely. (although 3 out of 4 broken nylon heat sink rivets - putting back, not taking out). Temperatures OK if not pushing it (with lid off, 1 rivet in place and some arctic 5 thermal compound). Will be slightly more comfortable once ebay member finally ships my replacements 20mm M3 bolts (which I ordered in anticipation thanks to someone else on here !)
So now I have questions... (I've added my thoughts/answers, but other mini owners may differ.)
- Can I get from 10.6.8 to 10.7.4 without using the target mode option as MBP dead until Apple acknowledge my NVIDIA chip issue.
(and of lesser importance)
(To recap past info here: Lion install wont run from an unsupported (by apple/lion plist) mini model like yours w/o removing or editing the supported macs plist file. That's why installs typically done from a natively supported Mac (via TDM, Ext. Case, drive swap).)
- Is there any way to take advantage of the 3 gigabit link speed in the SSD, rather than the 1.5 gigabit currently available on the mini - or is that just greedy?
(no way to upgrade the onboard SATA. There's a past article here on Installing an SATA II Mini-PCIe in the Airport card's slot for 2006-2007 minis (later models -do not- have mini-PCIe slot) - but most cards used are not bootable. Reports there generally were on SIL 3132 based cards which require a driver install. (And not bootable.) If anyone has tried that mod with a natively supported SATA card (JMB360, JMB362 - any others?) send a note if it's bootable.)
- Do I need TRIM (ing) ?
(Your call if you want to try installing the (unofficial) OS X univ trim enabler. IIRC that SSD does GC?)
- If I set an MTU of 9k on the mini and 9k on the QNAP (instead of 1500) - will it speed things up ? (do I need to change PPOE settings on the router in the middle (Asus RT56) also? (If you test w/chgs, report back on results)
Many thanks and regards to all who've helped in this mission.
-Lee"
Another 2006 Mini C2D CPU upgrade and OS X Lion Install (w/Target Disk Mode notes):
(added 6/19/2012)
"Mini 1,1 upgraded from core duo to C2D 2Ghz (T7200) and OS to Lion 10.7
Bought my new Core2Duo CPU from eBay for about 50 aud. Taking the mini apart was quite easy. Didn't need to use a putty knife as many of the guides say. I used a Swiss army knife and the bottle opener part. Lid popped off very easy and I did follow the ifixit guide which has great pics. New CPU in, thermal paste and all back together. Had a bit of trouble getting the lid back on as I caught the silver bits of the chassis. Lid back off and next attempt the lid wiggled on avoiding the silver bits. New CPU powered up no trouble at all and the temps seem to range around the 50°C mark when just reading emails, etc. Stressing the CPU sees it rise to about 70 to 80°C. Never higher.
Lion Install - this is where I had trouble as there are many ways to achieve this and it can be confusing... Below I post a step by step that hopefully others may benefit from it.
I have 2 macs. A 24-inch iMac and the above mentioned Mac Mini. Because I have this setup, I used the target disk mode install. Steps below.
(If not already owned) Buy FireWire cable. My iMac uses FireWire 800, mac mini uses FireWire 400. eBay cable with these connectors only 9 bucks!
(BTW - rather than a FW800-400 Cable, I bought an under $10 FW800 to FW400 Stub Adapter some years ago. Handy as I already had a lot of various length FW400 cables that it can be used with for mixed FW800/400 connections.)
Place both macs together so the FireWire cable can reach them both. Plug cable in.
Boot up iMac - my iMac had Lion installed from the APP store. I copied the Lion Installer to the desktop so it was easy to get to.
***** Important (notes on TDM w/duplicate HD names) - I had major issues trying to install Lion. The installer would start, I would choose the mac mini HD, the install files would copy across in about 3 minutes, then the iMac would restart. Upon restart I was faced with a selection of disks to choose. (And you could not specifically ID the mini's HD that you had selected as the target for Lion install as the drive to boot/continue from.) Nowhere on the web could I find the answer to this. Every guide just says " install via target disc mode" and that's it. Well after much head scratching I thought maybe it was getting confused because the iMac HD was called Macintosh HD and the mac mini HD was (also) called Macintosh HD. I changed them to different names - iMac HD and MacMini HD, (although renaming one would have sufficed) and attempted the target disk mode install again. This time when the installer copied the files and then restarted the iMac, the installer simply picks up where it left off and installs Lion to the MacMini HD - Success. I really wanted to report this here as it might help others. Just make sure your HD's don't have the same names. *****
Step by step guide continues...
... Boot up mac mini to target disc mode. Many guides say to simply hold down the letter T when powering up the mini. This did not work for me on several attempts. Luckily you can enter TDM from inside the OS. Go into system prefs, startup disc, and click the target disc mode button. The mini will reboot to TDM. Use whatever method works for you. Not important.
... back to the iMac. The MacMini hd should now be mounted and visible in Finder and on the desktop. If you took my advice above the HD will be named something unique like MacMini HD.
... Find the lion installer and double click on it. The installer will start. When the installer gets to the disc selection window it will be defaulted to the iMacs hd. Simply click the " other disc, more options " button to see all the discs you can install to. Find your MacMini hd disc, select it and continue.
... What will happen now - the Lion installer will copy about 3 minutes worth of data to the mac mini HD via the FireWire cable. When these files are copied the Lion installer will need to reboot the iMac so that the Lion installer can actually install Lion. When the iMac reboots the Lion installer will automatically continue with the Lion install. It will take about 30 minutes and a progress bar will be visible counting down the minutes. Once Lion finishes the install it will restart the iMac. Here is another GOTCHA. If you do not hold down the OPTION key when the iMac boots the iMac will boot from the mac mini HD which it just finished installing to. No big issue and it does boot from it too. (That treats the mini's HD as an external boot drive and since the iMac used was Lion compatible, it works w/o having to delete (or edit) the supported macs plist file on the mini's HD's Lion install.) Anyway just hold down OPTION during restart and you will be prompted for a disc to boot to. Choose your iMacs HD and the iMac will boot to OSX as it normally does.
Your mac mini should still be in Target Disk Mode as we have not touched it during this install. If it isn't make sure it is.
Back on the iMac we need to delete a file (the Lion install's supported models plist) on the MacMini HD. (Even though the Mini 1,1 has been upgraded with a (supported) Core2Duo CPU, Lion still won't run from the "unsupported" Mini model as long as the standard (unedited) supported models plist file is present. Some have edited the file but most just delete it.)
We will delete the plist file in the terminal.
Open terminal and follow these commands:-
cd /Volumes/xxxxxxxx (Replace xxxxxxxx with the name of your mini's boot drive)
Press enter
Sudo rm System/Library/CoreServices/PlatformSupport.plist
Press enter
You will asked for your (admin) password. Type your password and hit enter. The file will be deleted.
... Unmount the macmini hd by right clicking on the desktop icon on the imac and selecting EJECT.
... Turn the mac mini off by hitting the power button on the rear of it. (and disconnect FW cable used for TDM)
... Turn the mac mini on.
The mac mini should boot up as normal to OS X Lion. Enjoy. Before doing any software updates have a read through this page of reports as the plist file we removed might be put back by some updates (esp. combos) and your mac mini will not boot up. Don't panic if this does occur, you can put it back in target disk mode and use the commands above to remove the plist file again.
Sorry if this guide seems very basic to many of you but I wanted to do a step by step for those wondering if they could attempt it.
Summary:
- Put mac mini in Target Disk Mode
(See Apple's Target Disk mode guide.)
- Boot another (lion supported) mac and connect it to the mac mini via FireWire (putting mini in TDM)
- Run the lion installer and point it at the mac mini hd
- Delete the (PlatformSupport) plist file
Regards, MB"
I also welcome C2D upgraded Mini owner's comments on how they like Lion on those machines vs 10.6 or earlier OS's.
(Asked one of the Mini owners that updated the bootrom to 2,1 to support 3GB (vs 2GB w/mini 1,1) but never got a reply.)
I've not installed Lion on anything of mine yet. Not anything I really needed in 10.7, but I'll try 10.8.x at some point.
BTW: I hesitate to even mention this as maybe not an issue anymore but just a FYI in case any issues are seen after renaming a volume that has 3rd party apps installed. Some apps I've seen in the past included the actual Volume name of the HD it was installed on in some preference/config files the program(s) used. Maybe rare/not done anymore but I ran into that years ago with LW3D when I renamed a drive it was originally installed on. (Its prefs/config files included the actual volume name in file path/locations instead of a relative path. The config files were only text so I just searched/replaced the original volume name in the paths with the new name, rather than renaming the drive back, as I had too many "Macintosh HDs" from cloning, backups, etc. )
Another 2006 Mini C2D T5600 CPU upgrade and Lion v10.7.4 Combo Update notes:
(previous OS X 10.7.4 update reports here used SU/Delta updater (from 10.7.3 to 10.7.4) and said the supported macs plist file wasn't restored but this reader used the Combo updater (upgrading from 10.7.2) and said the file was restored by the combo update.)
(added 6/11/2012)
"Mac Mini Core 2 Duo T5600 CPU upgrade / Lion 10.7.4 (Combo Updater)
Some time ago I put a 1.83GHz Core 2 Duo into my late-2006 Mac Mini running Snow Leopard, and yesterday finally got around to attempting an OS X Lion 10.7.2 install. I don't have a second - newer - Mac so using target disk mode wasn't an option. I ended up making a bootable USB stick by following the instructions in a forum post
Sure enough, at the first reboot I got the blocked symbol so I booted from USB again and deleted PlatformSupport.plist, after which Lion booted normally.
I allowed System Update to apply 10.7.4 (I didn't make a note of the exact name, but I think it was called a Combo Update) (likely was since updating from 10.7.2), which *did* restore PlatformSupport.plist and stopped my Mac from booting again. I had to boot from my Lion installer USB stick to delete that file before the operating system would successfully boot once more.
Next up is to try that EFI upgrade so I can raise the RAM beyond 2GB...
--Alex M."
2006 *iMac* Core2Duo (2.33GHz/T7600) CPU Upgrade:
(Early intel-based iMacs had a socketed CPU like the 2006-08 Minis did)
(added 6/11/2012)
"20in 2006 2.0ghz Core Duo iMac CPU Upgrade
Just a quick note that I have completed the hardware upgrade of my old 2006 White 20" 2.0ghz Core Duo to a 2.33GHz (T7600) Core 2 Duo CPU. I also upgraded the HD to a Green WD 1 TB and replaced the PRAM Battery.
Took basically 12 hours to do but the machine is running great and I was able to update the OS to 10.6. CPU temp running around 50C. Followed the guide at www.maclife.com/article/create_upgrade_your_imac...processor
The example machines internal layout was a little different than mine as I have two heatpipe cooled chips and he only had one. I think that was due to the upgraded graphics - ATI x1600 with 256mb of Vram that I ordered with the machine.
The speed difference is easily noticeable. Bought the CPU Chip from NewEgg for $139 and the HD at Fry's for $94 (could have gotten a better deal if I had looked around) and I already had all the tools and Quick Silver Thermal Paste on hand.
I think it was a lot easier than what is portrayed on the internet however if someone is a novice and never worked inside say a laptop they will want to avoid the upgrade. Just takes patience and take a lot of pictures to see where every screw and connector goes.
One strange think I noticed is the Wifi card had two antenna connectors on it and there was only one antenna so I really don't know if I'm missing a second antenna or there is a difference in the two connectors.
(Not sure what card is in this 2006 iMac (802.11G originally I'd guess, Apple System Profiler info will card model/brand, etc.) Many cards typically have multiple antennas for MiMo. Typically 2 w/Broadcom (most common card) and often three for 802.11N Atheros. Some later macs had combo WiFi/BT modules but I think those were USB based and not mini-PCIe cards. Systems/Macs page here has articles on swapping out Mini-PCIe Airport cards in early Intel-based iMacs/Minis for a eSATA Mini-PCIe card.)
I didn't get a clear picture of which one of the connectors the antenna had been connected to and after putting it back together the signal reception is half what it had been.
(Any chance a wire got pinched or disconnected? I know some will wonder if a Bluetooth antenna wire was connected vs WiFi but from the notes you did not upgrade/change the wifi card or connections. Unless it's related to some interference?)
Thanks for a great site I've been visiting your site since you first started back in the 90's.
-Travis W"
Thanks Travis. (Tough times the last couple years but thankful to still be around.)
Another Firmware Update (1,1 to 2,1) and OS X Lion 10.7.4 Report (Core2Duo upgraded Mini):
(added 5/29/2012)
"I just updated (from software update menu) my Mac Mini 1,1 (w/Core2Duo CPU swap) with 10.7.4. It was the delta update (356MB) since the Combo update is over 1GB. No problems here.
(Several 10.7.4 Software Update (delta) reports here noted the supported models plist file was not restored/re-written. (If the file was restored, original Core Duo mini models would not boot to Lion as it's not in the standard supported models plist.)
Per later report above, the Combo 10.7.4 updater restores the file.)
I also carried out the mini 1,1 to 2,1 firmware update. (See earlier reports below for Mini 1,1 to 2,1 EFI firmware update thread link)
Still need to stick extra ram in the box (still has 2GB).
-Harold"
2006 Mini Core 2 Duo T5600 1.83GHz Upgrade:
(added 5/29/2012)
"Here is my experience with the 2006 Mac mini CPU Upgrade.
First of all I want to point out that I have more than 30 years of experience opening and doing all kinds of stuff with Macs and computers in general, with different levels of difficulty can I manage to solve and achieve my objective without many issues or obstacles... until now. I have to say that this procedure IS easy and I found it to be of no difficulty whatsoever especially after reading so many reports on how easy the whole thing is. More so after opening my Core Solo mini several times to max out the Memory and replace the hard drive for bigger and faster units. Well, this turned to be a nightmare for me when I finally decided to upgrade the slow Core Solo CPU for a faster and better suited Core 2 Duo.
Many things kept me from doing it earlier, first of all the mini is not my main computer, neither the most used among my setups of fairly recent Macs. My main computer, and also the one I heavily upgrade on a constant basis with ease, is a Mac Pro (Early 2008) that pretty much smokes almost anything out there. My other machine is a more recent MacBook Pro 13" (April 2011) that also had my hand inside maxing out the memory and stuffing it with a couple of OWC SSDs. It rocks.
The mini is a utility computer and my first Intel Mac that I keep around for miscellaneous tasks and common everyday use. But still, the Core Solo was too long on the tooth to keep dragging around, so I finally opted for a replacement. I searched for a cheap T7200 but I could not find one. At least one that didn't cost half as much as a used Core 2 Duo mini to justify it. So a settled for a chump change T5600 @ 1.83GHz considering that the performance push was going to be dramatic coming from a 1.5GHz Core Solo. And the price was so cheap (like it-could-pass-for-free kind of cheap). Moving on.
Opening the mini was, for me, easy like those jarheads that assemble and disassemble their M14s blindfolded... that is until I stomped into the dreadful plastic pins that held the heat-sink against the CPU... a total pain to remove. I never did it before so this was uncharted territory for me and frankly did not consider it much of a challenge as I had removed motherboards using similar gizmos. I cut my fingers, bend the metal fins on the heat-sink, slashed my knuckles with the metal fins, sweat like a pig and cursed like a demon on fire. It took me hours. Damn those plastic pins are hard, small and annoying!
I realize that the pins were so old and subjected to heat that they petrified to the point that it was impossible to squeeze them through the holes no matter what. I was pissed. Almost broke the logic board in anger and jumped to eBay to buy a used old mini, but then I decided to break the damn things and look for replacement alternatives. (some earlier notes on that here) I found them and finally I could put the new CPU in, some thermal paste, the heat-sink and put the whole thing back together.
The mini now runs night and day compared with the OEM Core Solo. Temperature is basically the same as before considering the two cores and higher clock speed. One thing that puzzled me, I wanted to install Lion and sampled a test drive by booting it from an external 2.5" USB 2.0 HDD that has a recent virgin version of Mac OS X 10.7.4... For some reason I cannot figure out, the mini's temperature rose 10-15 °C higher under 10.7.4 than when it's running under 10.6.8 from the internal drive. Also, Activity Monitor shows irregular core activity (looking at the two CPU bars) with bars peaking 100% at random moments in idle mode. For this reason I'll put the OS upgrade on hold until I find out what's going on.
The mini is now a smooth little utility Mac with a fast 7200rpm drive, 2GB RAM (I also did the firmware upgrade but I have no more Memory SO-DIMMs to upgrade it further than the original maximum limitation) and the "new" Core 2 Duo.
-Barton"
FYI: See Barton's later June 22nd, 2012 report for his a follow-up on his mini's OS X Lion install.
Another 2GHz (T7200) Core2 Duo Upgrade and OS X Lion (10.7.4) Report:
(another FYI that 10.7.4 via software update didn't restore supported macs plist file)
(added 5/16/2012)
"2006 Mini Upgrades:
- Upgraded 1.83 GHz Mac Mini (MA608LL/A) to a Core 2 Duo T7200 2.0 GHz
- Installed OS X Lion and upgraded to 10.7.3 via target disk mode.
- Deleted /System/Library/CoreServices/PlatformSupport.plist
- Upgraded to 10.7.4 (w/o target disk mode) using software update.
- PlatformSupport.plist was not reinstalled (via software update).
(Due to size, I cropped the 1st screenshot)
Pre OS X 10.7.4 Install:
Post OS X 10.7.4 Install:
-Walter B."
I asked Walt how Lion is with only 2GB ram. (Some earlier reports noted updating the firmware to mini 2,1 with 3GB ram support.)
Another 2.33GHz (T7600) Core2 Duo/EFI Firmware Upgrade and OS X Lion Report:
(Includes FYI on 10.7.4 update but didn't list if SU/Delta or combo update used)
(added 5/11/2012)
"Mac Mini CPU Upgrade
I just updated my 2006 Mini (upgraded to a C2D 2.33 GHz chip) to the new Lion update, 10.7.4, and the update didn't seem to replace or repair any files adjusted or deleted to fool Lion into running on otherwise-unsupported machines with the C2D chip upgrade. (He's referring to the supported models plist file. Past notes on that here.)
(Did you update to 10.7.4 via SU, a download of a Delta or Combo updater?
In the past it has sometimes mattered as far as restoring/rewriting that plist file.)
I used plain old Software Update.
(If any C2D updated mini owner tries the 10.7.4 Combo Updater, send a note if it restores the plist file.)
HOWEVER - and I think this is very newsworthy - it turns out that it is possible to update the firmware in the 2006 Mini to that of the 2007 Mini. (FYI: The Mac Mini 1,1 to 2,1 firmware update is noted in a previous report below w/netkas link.)
Once that is done, the machine can recognize 3 GB in RAM - a 50% improvement over the 2 GB max that the original firmware allowed.
It is super easy: copy a few files into the System Folder, reboot, and four minutes later you have a machine that thinks and acts like it's a year younger. I did this on my machine two days ago, and installed 2 x 2GB RAM chips in it this evening. It's now running like a charm in 3 GB of the 4 GB of RAM installed.

Here are the details - the exact process is on page 8.
(link sent has phpsession ID, so repeating link from prev report here)
http://forum.netkas.org/index.php/topic,874.105.html
I know nothing about how they figured this out but can confirm that it is easily accomplished by a novice who can follow directions! Thanks for a great website.
-TP"
Another 2GHz (T7200) Core2 Duo Upgrade Report: (Includes info on Firmware Update to Mini 2,1)
(added 4/9/2012)
"Mac Mini T7200 upgrade
As many of you, I have just upgraded a Mac Mini 1.6 Core Duo to a Core 2 Duo T7200 (2.0 GHz) processor...
I bought this Mini used for 50 Euros (1GB RAM, 60 GB HDD) without a working power supply, which I also bought used for 18 euros.
Next step was a firmware upgrade, stepping my Mac Mini 1.1 to Mac Mini 2.1, for the advantage of being able to increase the RAM to 3Gb (based on the method described on this forum: http://forum.netkas.org/index.php/topic,874.105.html) ... no native Lion install yet, though!
I managed to get my hands on a T7200 for 20 Euros, and followed the various upgrade guides available (especially the excellent Ifixit tutorial..) to proceed with the upgrade... the minor setback was breaking one of the heat sink pins, replaced with the screw and bolt solution.
Also upgraded the Ram and HDD with spare parts I already had available, so I now have a Mac Mini 2.1 at 2.0 GHz, 3GB Ram and 160GB HDD for a total cost of 88 Euros, or $115... very happy with the project!
-Pedro"
2.33GHz (T7600) Core2 Duo Upgrade:
(from Mar 25, 2012 mail)
"Mac Mini CPU Upgrade
I just upgraded my son's 2006 mac mini from a 1.6GHz to a Core 2 Duo 2.33GHz bought on ebay, brand new for $105 and a tube of Artic Silver 5 from Ratshack ($11.99). The chips were even advertised as being for the mac mini.The various instructions available on the web are a big help but do not adequately address a few things. The screw that holds the motherboard down in the front right corner is longer than the other three. I marked this location on the top of the cd drive with permanent marker so I wouldn't lose track.
The airport connector is on an annoyingly short cable. When re-installing connect it first before trying to replace the black plastic shroud holding the computer's guts.
When the black plastic shroud is out turn it over and check the fan for dust or problems. Spray it with a can of air to clean dust out and insure the fan spins well.
When removing the motherboard, the sticky heat transfer pad beneath the motherboard will hold the board down. Use something to gently lever the rear corners forward until they break lose and the board can be lifted out. When reinstalling make sure to wipe the bottom chip down with alcohol so it will re-stick cleanly (odds are your fingers touched it when the board was loose. Apple reccommends replacing the transfer pad but unless you have a source you won't be able and will need to reuse it.
Once the board is out, turn it over and use needle nose pliers to carefully squeeze the plastic tips, first one side then the other, while applying slight pressure to pinch the end closed and nudge it under the hole edge then the same to the other side. By doing this carefully you can pop first one of the expanded tips into the hole then the other and the spring tension will immediately pull the pin through. I read a lot of horror stories about people breaking these. They are very similar to the motherboard standoffs used in many pcs but on a much smaller scale. Being familiar with those from building many pcs, I was able to apply the same methods as removing a pc motherboard from the standoffs.
Note the position of the heat sink! If you don't, and this is not documented anywhere I saw, you can install it in the wrong orientation -there is nothing to prevent doing it- because the holes are in a square formation they fit . And because the heatsink is rectangular the black plastic shroud will not fit back over and you have to disassemble the heat sink again to correct it. The thing to remember is the heat sink has about a half inch length in one direction and this points towards the back of the case.
When reattaching the heat sink's plastic posts I placed the entire motherboard on a portion of a compartmentalized tray so that the bottom chip area was not touching the table but the board was supported. I used the same needle nose pliers with their points opened to cover most of the pin head and then to carefully push down the plastic heads until the pin clicked. After all are done, turn over the board and use a hook of some sort to wedge open the pin's legs to make sure they are locked in place. Dental tools or an A.B. Dick Stylus 470 work well. That stylus I've used for years to hook and relatch laptop key scissor mechanisms among other things.
Once the motherboard is back in the case I reconnected the power button and then connected it to power and a monitor to verify it would start (before reassembling further. Once confirmed I put it all back together and it works well.
Tomorrow I upgrade my 2008 Pro from two 2.8GHz quads to two 3.2GHz quads.
regards, Wolf"
2.33GHz (T7600) Core2 Duo Upgrade:
(From Mar 4, 2012 mail)
"Mac Mini CPU Upgrade
"Upgraded an Intel Core Duo 1.66GHz I received as part of upgrading (replacing) a client's mac-mini to a new i5 model so client could do iCloud and Lion. Bought a 2.33GHz C2D chip on eBay $97.99, new heat sink compound and a couple of nylon screws and nuts in case I needed them. Ended up using 2 of the nylon screws and nuts as they broke when re-installed. Upgraded to a 169 gig apple sata drive left over from a 500 gig client upgrade
Booted to the old drive in a usb case and did carbon copy cloner.
Reading now on the lion upgrade which I may do to the old usb case drive and then redo carbon copy cloner.
May also get a SSD drive before I put it back together.
Working well...
-Kirk R."
OS X Lion 10.7.3 Update on Core2Duo Updated Macs:
(FYI/Update: As noted on the front page news on Feb 6th (2012), Apple pulled the original Delta 10.7.3 update (redirecting to Combo Updater) and now some even say a Software Update applied 10.7.3 reinstalled the supported models plist. Earlier reports on SU 10.7.3 follow, but again Combo Updaters (and now SU also) reportedly reinstall the plist file.)
(From Feb 20, 2012 mail)
"10.7.3 and C2D upgraded iMac
I upgraded my CD mini to a C2D. I started with 10.7.1 (server), upgraded to 10.7.2, and now to 10.7.3. When I upgraded to 10.7.2, it bricked the machine and I had to fix the "PlatformSupport.plist" again using target disk mode from another machine. With 10.7.3, I didn't need to do that. Instead, I patched the "PlatformSupport.plist" file in the installer before installing, and I had no problems. A quick rundown of how this was done (from the terminal):
> pkgutil --expand /Volumes/Mac\ OS\ X\ 10.7.3\ Server\ Update\ Combo/MacOSXServerUpdCombo10.7.3.pkg expanded.pkg
> cd expanded.pkg/MacOSXUpdCombo10.7.3.pkg/
> mkdir Payload_unpack
> cd Payload_unpack
> sudo cpio -im < ../Payload
> sudo emacs ./System/Library/CoreServices/PlatformSupport.plist <AddMac-F4208EC8>
> sudo emacs ./System/Library/CoreServices/com.apple.recovery.boot/PlatformSupport.plist <AddMac-F4208EC8>
> su
> find . | cpio -oz > ../Payload_new
> exit
> sudo rm -rf Payload_unpack Payload
> sudo chmod a+rwx Payload_new
> mv Payload_new Payload
> cd ../..
> pkgutil --flatten expanded.pkg flattened.pkg
Then double click on "flattened.pkg" to install
-Shawn"
Earlier 10.7.3 reports follow.
(Follow-up on Lion updates from Luca sent within an hour of posting the Feb 1st 2012 OS X 10.7.3 Update)
(From Feb 1, 2012 mail)
"10.7.3 and C2D upgraded iMac
Hi, here's my usual report about my C2D upgraded iMac 20" and OS X Lion Updates.
I'm happy to say the 10.7.3 update (installed via Software Update) does not reinstall /System/Library/CoreServices/PlatformSupport.plist and the Mac reboots smoothly.
I think sometimes we have to expect the unexpected from Apple...
Best regards, Luca P."
Thanks again Luca.
(I was curious if the D/L Combo Updater would reinstall the PlatformSupport.plist file or not, since the 10.7.2 update did (see tip/notes below) but reportedly 10.7.1 didn't. Over the years the Combo updater has often been a fix for those that used Software Update or Delta updates and had problems, including some 10.7.3 (via SU) problems reported in Apple's forums. However it won't be a fix for all of course. But again I was wondering if the Combo updater would reinstall the PlatformSupport.plist file, which would have to be removed to boot a Core2Duo updated CD Mac.)
Update/FYI on Combo 10.7.3 Updater:
Brian K. sent a reply to my question above saying the 10.7.3 Combo updater did reinstall the supported models plist file. He said he was using an edited plist file to add support (where others just deleted the plist file) but it was overwritten by the Combo updater. So regardless if you deleted the file or edited it, from his experence Core2Duo upgraded (original CoreDuo/unsupported) mac owners should avoid the combo updater. (The 10.7.2 update also restored the plist file as noted here (with fix/tips) when it was released (see below), even when it was applied via Software Update, not the combo updater.)
Reports on earlier Lion version updates follow.
Warning about 10.7.2 Update on Core2Duo upgraded Macs (w/Fix)
One of the readers that had previously reported running Lion/10.7.1 OK on his Core2Duo CPU Upgraded Mac (originally a core duo model) sent a warning about 10.7.2 reinstalling the supported macs plist. (That file was deleted as part of the workaround to run Lion on C2D upgraded unsupported macs.)
(Added 10/12/2011 when OS X 10.7.2 update was released)
"Subject: Core2 Duo Upgraded Macs and 10.7.2 WARNING
Here's my usual report about latest update of my C2D upgraded iMac 20".
I'm sorry to say that 10.7.2 reinstalls the infamous /System/Library/CoreServices/PlatformSupport.plist and Mac doesn't reboot, showing only a "forbidden" icon in place of the apple logo.
(The 10.7.1 update didn't recreate that plist file per several reports earlier this year.)
Booting again (fixing problem/deleting that file) is a very simple task if you have another Mac or a system DVD. (And having a previous OS version bootable clone handy is a very good idea in general. Well worth the cost of the drive IMHO.)
(If you have another mac) Just press T at the startup bong to boot in target (disk) mode, connect to another Mac using a firewire cable and delete /System/Library/CoreServices/PlatformSupport.plist on the newly mounted (C2D Mac's 10.7.2) Volume. (If you have an ext OS X bootable HD, power up w/option key held down and boot from it.)
Or with an OS X system DVD, just boot from it and start Terminal in the Installer menu bar, cd to the actual (Lion) hard disk volume and issue the command:
cd /Volumes/<HD NAME> (name of the C2D mac's 10.7.2 Vol)
rm System/Library/CoreServices/PlatformSupport.plist
That's it.
Regards and sorry for my bad english.
-Luca P."
Server 10.7.2 does the same thing. C2D Upgraded mini owner running Lion server sent a note about that. Same fix (removing file) of course.
Another 2GHz (T7200) Core2 Duo Upgrade Report:
(from Sept. 24th, 2011 email)
"Thanks to all of the information here, I was encouraged to upgrade my son's Mac Mini 1,1 1.66gHz model.
After acquiring a T7200 2.0gHz CPU from a notebook pull, we proceeded with the surgery. All went very well, I was even able to remove the plastic heatsink pins by using an electronics needle nose pliers and very carefully releasing them.
Removing the flat cable connection to the drive board is not a good idea, in my opinion; I removed it, and reassembly was a a bit tricky; it could have very easily been ruined in the process, I definitely won't be doing that again.
The results are great so far. The Geekbench score improved from 2117 to 2841! CPU temps seem like they're in the same general operating range as before. Next I'll have to get an SSD drive...
Thanks, Mike S.
Texas"
OS X 10.7.1 Lion/Lion Server on Core2 Duo Updated Mini (and iMac)
(*Updates* See later posts above on OS X 10.7.3 Update (Feb 1st, 2012) and previous Warning/Tips about 10.7.2 update.)
Reader mails from owners of Core 2 Duo upgraded (originally CoreDuo) Minis/iMacs. Some may have been concerned that 10.7.1 would break that or recreate the (deleted) "/System/Library/CoreServices/PlatformSupport.plist" file, but all reports so far said 10.7.1 still worked.
(Update: From Sept 14th, 2011 news page) Although 2 readers with Core2Duo upgraded CoreDuo Macs reported running Lion OK (see reports below from Aug 17th), I recd a mail on Sept 13th from a Core2Duo upgraded (CD) Mini owner that said the tip (see above) did not work for him. I wondered if something had changed (app store installer change, etc) or if this is another case of some detail not evident. (My first thought was the plist file was still present, so I asked and he said it was deleted.) Here's his email:
(from Sept 13th, 2011 email)
"I have an early 2006 mac mini that was updated to a core duo 2 cpu. (socketed CPU chip swap) It has worked flawlessly since the upgrade. I also maxed out the memory to 2GB... I read that I could defeat the Lion install block (check for supported models) by starting the mini up in target mode & installing the software to the mini's HD (from a Lion supported model) then removing the following "/System/Library/CoreServices/PlatformSupport.plist".
I did this and almost started celebrating. The next step was to start up the mini normally.
Initially it looked as if the start up was going to be successful, then it sort of hiccupped and went back to the snow leopard start up screen. Along with a dialog box stating the system could not be installed on this hardware.
(Based on that message at boot, I thought the supported platform plist file was still present. I asked if he was sure that plist file was deleted - he later replied it was.)
Then I read on one of the list serves that Lion couldn't be installed on a 32bit system.
-Bill J"
Lion doesn't support 32Bit CPUs but a Core2 Duo is 64bit. If he means EFI32 systems, that's not an issue as 2006/2007 Mac Pros are EFI32 but have 64bit CPUs and can run Lion.
In reply to the above, on Sept 14th I recd another OK report on a Core2Duo upgraded CD Mini running OS X Lion, including the 10.7.1 update:
(from Sept. 14th, 2011 email)
"Subject: Lion 10.7.1 on upgraded mini
I also have a 2006 Mac mini that i upgraded with a T5600 (1.83GHz Core2Duo).
I installed via FireWire target mode using my early 2011 MacBook Pro then deleted the .plist.
I used software update to get 10.7.1, no issues.
-Jonathan"
He also included a screenshot of "About this Mac" from Lion, showing his Mini 'Late 2006" with 1.83GHz Core 2 Duo:

And another successful Lion on C2D updated Mini report:
(from Sept. 14th, 2011 email)
"Subject: Lion on C2D Upgraded Mini Works Fine
Just a quick letter in response to Bill J's trouble to say that I installed Lion on a Core 2 Duo upgraded Mac mini (Late 2006 "Macmini1,1") on September 9 using the method given on your site and all is well.
Also to respond to the performance naysayers, this computer with an SSD is fantastic! Keep up the good work,
-David J.
Sydney, Australia"
SSDs really do make a difference compared to std HDs. So snappy it often 'feels' like you bought a new machine. (I'd almost forgotten what a difference it was until getting to play with an intern's new MBA. Going back to my 5400 rpm HD work machine, opening apps is slow as molasses.)
Reports that follow are copies from the Aug 17th news page:
(added 8/17/2011)
"Lion Server 10.7.1 update on CoreDuo to Core2Duo upgraded (Mini) works!
I have a CD mini upgraded to C2D (Core2Duo) that I installed 10.7 (I also installed the server app) using the "install lion from a compatible machine to the HD for a CD upgraded to C2D mini" (and deleting the above plist.).
Today I upgraded to 10.7.1 Server - no need to re-delete the plist file as it is not recreated in the server update. I can't speak for the non-server update but I doubt it would be any different.
-Brian"
And a report from a (socketed) iMac with Core2Duo CPU swap:
(added 8/17/2011)
"About 10.7.1 update (on C2D upgraded iMac)
I just wanted to let you know that is safe to upgrade to 10.7.1 for those "Core2 Duo upgraded" Macs with Lion.
I installed Lion on my 20" white iMac (using the destination disk mode hack and removing PlatformSupport.plist before rebooting) and I have just installed 10.7.1 without problems.
Regards, Luca P"
More 2.33GHz (T7600) Core2 Duo Upgrade Reports: (later added first)
(added 8/15/2011, updated 8/19)
"2006 Mac Mini Intel Core Duo 1.66GHz upgraded to Core 2 Duo 2.33GHz T7600 SL9SD.
Already upgraded the memory to 2GB a while ago and then decided to upgrade to a bigger Hard Drive. Whilst browsing for info, I noticed that a cpu upgrade was also possible - so I did that too.
Used the OWC video (at their DIY Videos page) to remind myself how to pull it apart and then the video on this page to remove the motherboard.
Got the cpu and a packet of nylon nuts and bolts from eBay and some thermal paste from the local computer shop. Everything went smoothly and I even managed not to break or damage the original pins that secure the heatsink.
I supported the head of the pin with the flat end of a lead pencil, pressed on the spring and squeezed the flared edges of the pin with a small pair of needle nose pliers. If you then release pressure on the spring slowly whilst still squeezing the flared ends, the pin will then pop gently through the board without flying off into your room somewhere. Very happy with the results. Mini is much more responsive with no noticeable increase in heat or fan noise - just as quiet as it ever was!
All up cost was about $150.00 AUS (not including the HD). Could have done it for much cheaper using a T7200 2GHz but couldn't resist the T7600 when one came up.
(Update from Aug 19th mail)
Purchased Lion through the Appstore it is now working on the upgraded Mini.
But had to take a few extra steps along the way.
I have no access to a Mac that is supported by Lion so I couldn't do the Firewire target drive process. Instead:
Carbon Copy Cloned my Snow Leopard mini HD to an external usb drive.
Joined the Tonymac forum and downloaded iBoot, Multibeast and XMove - a site dedicated to running retail OS X on PC's. Created the iBoot CD and loaded it onto my desktop Dell Core 2 Windows computer along with my cloned Mini HD. The Dell then booted up fine and then loaded the Mini HD. System Information reported that I was simulating a MacPro 3.1.
Connected to the Appstore and purchased Lion - downloaded it and then installed it onto my cloned Mini HD.
Modified the PlatformSupport.plist file and then reconnected the external HD to the Mini and booted from it.
It worked!
Deleted the CC clone logs on the external and reformatted the Mini internal drive, then CC cloned the external drive back onto the internal Mini drive.
Shut down, disconnected the usb external drive and rebooted into Lion on my Mini. Upgraded to 10.7.1 - no problems.
Was a bit of a process - but I was determined to do the job without using a hacked torrent from somewhere. (beware gifts bearing trojans) Have left out a couple of trial and error steps in what I did - but I got there and everything works.
-Guy H.
Australia"
(added 8/5/2011)
"Upgraded my 2007 Mac Mini 2.0Ghz (T7200) with an 2.33GHz (T7600) yesterday. Bought T7600 at ebay and the seller included a "special" tool to prevent break off the brittle, springed nylon locks holding the heatsink in place against the CPU.
Overall I'm very happy, though it was a small jump :)
Lars AH, Norway"
(added 6/20/2011)
I upgraded a 1.66 Core Duo to a 2.33 Core 2 Duo chip from eBay for $128.
These instructions worked great. A 2.5mm allen wrench is the tool to loosen the metal cylinder near the Mini's memory slots if the correct Torx is not available. And I concur that it is impossible NOT to break off the brittle, springed nylon locks holding the heatsink in place against the CPU.
I have a small handful of extra M3 x 20mm nylon "bolts" (actually machine screws) and nuts that will replace them.
-TP"
Another T7200 (2GHz) Core2 Duo Swap Report:
(added 4/22/2011)
"I have just upgraded from a 1.66GHz Core Duo to a 2.0GHz Core 2 Duo (T7200) that I bought on eBay for �40, as well as swapping the HD for a Corsair F120 SSD, and the difference is amazing.
iPhoto is now super-snappy rather than barely usable.
Thanks to the advice on this page I was well prepared with nylon bolts, as I did break one of the existing clips when dismantling. I also found it helpful to attach the heatsink with two bolts without the springs first, to keep it in place while I attached the other two complete with springs - I could then go back and add the springs to the first two.
I was a little confused as to what a 4-40 bolt was to begin with, (#4-40 is an american (inch) std thread - size #4 w/40 threads per inch. ) but a little bit of research showed that the metric equivalent (appx size) is a 20mm M3 bolt. I bought a pack on 10 (bolts + nuts) from eBay for �1.60 and they fit perfectly.
Thanks, Jon H."
T7600 (2.33GHz) Core2 Duo Upgrade Report:
(added 3/25/2011)
" Swapped the 1.86Ghz chip with a 2.33Ghz model pulled from an IBM T60p laptop.
CPU Model is T7600 - 2.33/4M/667Mhz, LF80537
No problems or issues.
I have a spare one if you know anyone who is looking.
(NOTE: I think it's sold now after 2 readers asked about the 'spare' CPU)
-Stacy P."
Another T7200 (2GHz) Core2 Duo Upgrade Report:
(added 3/21/2011)
"After reading the recent reports, I decided to give my mac mini a speed bump. Purchased a T7200 chip (2 Ghz, Core 2 Duo) off ebay for $50. Purchased everything I needed - acetone, thermal paste, and the 4 nylon screws and nuts.
After a few flying screws and springs, (all of which were miraculously found!) I managed to get the chip swapped. When reassembling the mini, I realized that I placed the heat sink in the wrong direction. After getting it all back in place, the mini booted up. It appears to be a bit snappier. I do not have a monitor hooked to the mini. I use Screen Sharing via my Imac to access the mini. I use the mini for home automation via Indigo and surveillance via Security Spy. It's also used for music throughout the house via Itunes. I leave those three apps running at all times so it does need all the extra muscle that the 2 Ghz chip over the 1.66 Ghz chip.
One thing I noticed is that the fan was spinning at high speed. Having swapped out the hard drive and memory, I encountered this problem before as I had forgotten about reconnecting the wire that is in the front. Only this time, I did not forget to reconnect it. Took the mini apart several times to ensure I hadn't forgotten anything. Still have the fans spinning at 5495 RPMs. Core Temps have hovered around 50 degrees C.
I'm wondering if I need to remove the heat sink and essentially start over to get the fan speed and noise back to normal. Hoping someone can give me some good advice on this. Have had the mini running under the new chip for approx. 24 hours now.
Thanks, Lee M."
(Update: On Nov. 19th, 2012 Lee sent a later report on OS X Lion and EFI firmware (to 2,1) updates)
More T7200 (2GHz) Core2 Duo Upgrade Reports:
(added 3/14/2011)
"Got a mini 1,1 with 1.66GHz core duo for $75 and put in the 2GB RAM + Seagate hybrid drive (HDD+SSD cache) I had sitting around. Runs fast. The hybrid drives gives it speed approaching SSD for boot and commonly used applications.
Got a C2D T7200 CPU from ebay for $45 shipped and replaced the 1.66GHz CD. I broke 2 out of the 4 fan installation clips like most people did. No worries, local ACE hardware store had the 4-40 3/4 inch nylon bolt+nut for $2 for a set of 4. I used these on the reinstall. A nice trick on the reinstall is to put 2 of the nylon bolt+nut pair on diagonally without the springs just to hold the heat sink in place. This allows you to install the other 2 with spring on. A second pair of hands is helpful to spin on the nut while one person use a flat head screw drive to push the bolt through and tension the spring.
As others have, I used acetone to clear the old gunk off the heat sink. I used (Arctic Silver) AS5 paste and it has worked well. Temperature is about the same as before.
Got a AOC 21.5 LED 1920x1080 monitor for this since the new 21.5 iMacs have the same resolution+LED lighting. Looks awesome. The new C2D T7200 scales hulu.com to full screen without much problem (1.66GHz CoreDuo had jitters) There are still a few drops here and there but much less noticeable.
-Howard C."
And another T7200 upgrade report from March 2011"
(added 3/14/2011)
"Got my T7200 (2GHz, C2D), purchased from Ebay, yesterday. I paid some $80 for it. Swapping took some 30 minutes. The new CPU replaced a 1.66 GHz Core Duo. The job was easier than I'd thought it'd be. On the other hand I have had my Mini (Macmini1,1) opened a few times before, to upgrade memory, hard drive and also the wireless card. I ran a Geekbench test before the change and one after (2.1.12 for Mac Os X x86, 32-bit). OS is 10.6.6.
Here are the results:
Before:
Geekbench Score: 2175
Integer: 1634
Floating Point: 3400
Memory: 1457
Stream: 1194
After:
Geekbench Score: 2750 (26 % increase)
Integer: 2258 (38 % increase)
Floating Point: 4129 (21 % increase)
Memory: 1840 (26 % increase)
Stream: 1475 (24 % increase)
Cheers, Mikael"
T7200 (2GHz) Core2 Duo Upgrade Report:
(added 2/8/2010)
"I usually work on Apple laptops but I did my first intel Core Duo to Core 2 Upgrade on an Apple MacMini today along with an upgrade from the base 512 MB to 2 GB as a favor for a friend.
I used a T7200 (2 GHz) bought on the net from a place in west Japan (I am in Tokyo) for 14,900 yen plus 2 x 1 GB of RAM for about 2000 yen each, so the total cost was just about 20,000 yen without shipping. (Could not find the T7200 in Akihabara although there were a lot of T7400 and T7600 for what I though were excessively high prices for an old CPU.)
In terms of difficulty, the hardest part was getting the heatsink off the old CPU, because Apple in its wisdom decided to use rather fragile plastic spring-loaded clips that degrade in tensile strength with heat aging (more built-in obsolescence - why does Apple love to use plastics and double-sided tape to secure key parts) and one of them broke as I was gently releasing it. Fortunately, my large tray of random screws from years of laptop disassembly and parting yielded some thin screws that worked just as well as spring loaded clips.
One point to be very careful about is the orientation of the heatsink on the chip; I lost my focus for a few seconds when the clip broke and forgot which way the heatsink went back on. The result was that I replaced it 90° rotated, which I only discovered on trying reassembly and added 20 minutes to the job.
The RAM upgrade was painless.
Total time was about 2 hours because I was going slowly but having done it once, I think an hour is about right.
Going from Intel Core Duo at 1.66 GHz to Core 2 Duo at 2 GHz makes a huge difference in perceived speed, especially with upgrading to 10.6.2 (usability rating is 9/10).
In terms of cost effectiveness, I think it's just about OK at around $200 and gives a new lease of life to this machine with Snow Leopard (cost effectiveness rated 8/10).
The next upgrade when/if the owner can afford it is to change the slow stock 60 GB HDD to either a fast 7200 rpm 250 GB HDD or a 120 GB SSD.
-Robert H."
"Eng. Sample" T7400 equiv. (2.13GHz) C2D Upgrade:
(added 8/13/2009)
"I upgraded the CPU in my Mac Mini today from it's original T2400 (1.83/2M/667) to a T7400 equivalent engineering sample (2.16/4MB/667 ES). I bought the CPU from eBay before I realised it was an engineering sample, however it has made no difference thus far. My motivation for upgrading was that the T2400 was dropping frames on full screen Flash video (Flash seems more CPU hungry on Mac OS X than on Windows---grrr---I hate Flash). (amen brother...)
I conducted two simple benchmarks both before and after the upgrade to make me feel better about spending the $168.00 USD.
First I measured the CPU utilization of Safari using "top" whilst the browser was at the main menu of a Flash based video-on-demand site (I would have liked to have used actual playing video, but the usage varies as the video plays, and I was too lazy to take a specific piece of video and calculate an average). For some reason the static menu uses a fair-bit of CPU power. Here are the results (before --> after)
Flash Page Open (Safari): 53-56% --> 38-41%
And secondly I used GeekBench. I'm not a fan but it's fast, simple and free. (I've never used it personally but doesn't a Geekbench license cost $19.95 still? Not a big fan of Xbench either, but it's free and has always been popular as simple/quick benchmark.)
The 32-bit benchmark of Geekbench is free. You have to pay the $19.95 for the 64-bit and Rosetta benchmarks.
GeekBench: (before --> after)
- Overall: 2353 --> 2908
- Integer: 1877 --> 2398
- Float: 3622 --> 4299
- Memory 1524 --> 2049
- Stream 1236 --> 1551
As for temperatures, even though there is a TDP increase of 3 Watts, I noticed a slight lowering of 3 degrees at idle and 1 degree at load (note that room heated with the day as I conducted the before and after tests). This was probably due to the fact I was able to blow some dust out of the machine, and the extra work I spent sanding and lapping the CPU heatsink (the old thermal paste was quite difficult to remove, which started me off on the tangent of trying to clean-up the surface as best I could). Or maybe I somehow interfered with the sensor with the heatsink.
Oh one other thing, on the first boot there was a scary wait of an extra few seconds for the startup chime to sound---I've never been so relieved to hear it!
Most importantly for me, I've watched a few minutes of full screen Flash video and I haven't seen any frame dropping. So I'm very happy.
I would do it again. Although I still feel a little uneasy about having unintentionally purchased an engineering sample. Thanks for the great site,
David"
There's pros and cons to ebay - sometimes a great deal, sometimes you may not get exactly what you thought (or was promised).
Another 2.16GHz T7400 Core 2 Duo Upgrade:
"
I bought a 1.66GHz Core Duo mini off of eBay for use as a home theater computer, as the process of getting a DA G4 was just about never ending with trying to add parts for remote control and a reasonable HTPC front end was just about non existent. While playing a high bit rate file, the video would play fine just occasionally dropping a frame, but the audio would drop out constantly.
I determined that the only option was more power! While it appears from what I read, that the T7200 (2GHz), does fine for what I wanted, I figured it would be better to be a bit more future proof with a faster CPU. While I wanted to get the T7600 (2.33GHz) it was the most expensive of the three options, and over $250 at the time.
I bought the T7400, which is a 2.16GHz part, from a vendor on eBay, kaga0719, who I recommend fully - just make sure it has pins, as he has reworked BGA parts that have pins, and ones that don't. The CPU arrived within a week of payment, and when the weekend arrived the fun began! Kaga supplies a thermal compound, but since I already had some Arctic Silver I used the AS.
Recommend tools/supply list:
- Putty knife
- 4 x Nylon 4-40 nuts
- 4 x Nylon 4-40 3/4" bolts
- Acetone
- Q-Tips, Toothpicks, Scotchtape
- Needle nose pliers
- Thermal compound
I already had a putty knife from upgrading the memory in my G4 mini, but I forgot to pick up some acetone to clean the heatsink, so I had to make due with a fair bit of rubbing with other solvents and Q-tips.
Since I expected the plastic pin's retainer clips that hold the heatsink down to be damaged beyond safe reuse during the removal, I bought a set of 4-40 nylon nuts, washers, and bolts at a very good hardware store. I understand that they can also be had a hobby/model/remote control shops. At the time, the set plus a extra of each was a buck, but when I bought several sets recently, they prices had gone way up to two bucks for each set. Anyway, the bolts should be 0.75 inches as the original pins 'inside' length is 0.65 inches. In the final assembly, I didn't need the washers, and they would have made it much harder if I tried to use them.
While the pins are replaceable, the springs that push the heatsink down on the CPU are not. Do NOT let them fly! I recommend just using some scotch tape, and taping over the pins on the heatsink. This will keep them from flying off, and you can easily extract the pins and keep the springs.
I used a set of needle nose pliers to compress the retainers, but until one applies big tools to extremely small parts, one can not appreciate how careful you must be while working with the mini's motherboard! Originally I planned on using a diagonal cutter to clip the bottom of the pins, but when my Snap On cutter came close the the motherboard, I didn't like the looks of what could happen, so I used the needle nose pliers to compress the clips.
I've read that some people didn't notice the locking mechanism for the CPU, and have damaged the socket, or the motherboard trying to pry the CPU out! So remember to turn the screw on the socket to unlock it!
The new CPU goes in and a bit of Arctic Silver goes a long way. Make sure the the heatsink is put back on with the correct orientation! You might want to also have some toothpicks to help keep the heatsink in position while you do battle with the nylon nuts and bolts and the heatsink. A third hand would come in really nice at this point!
After putting the mini back together, but before the top is on, start it up and make sure everything is running right. There are plenty of connectors that might be forgotten during the reassembly and re-cracking the case is an avoidable pain if something isn't connected.
Post assembly, everything runs great! However I noticed while using Handbrake, the CPU temps would get very high. While this chip is rated for 100 degrees C, it was running in the mid 90s for hours at a time while going through my Handbrake queue. This was handled by using a third party fan control program. It now runs in the 70s while processing the Handbrake queue, but the fan is quite loud at 5500 RPM.
While using the mini for the home theater running Plex, and even with high bit rate files I don't think that the fan has ever run up to more than a barely noticeable level(unless Plex has locked up...).
From online discussion, it would appear that, in general, the T7400s run a bit hotter than the T7600s, but I can live with it for a $100 price difference!
An additional benefit of upgrading the CPU with a Core 2 Duo, instead of the much cheaper Core Duo part is that I can use a faster Apple wireless card, of which the only requirement is a C2D.
Thanks again for a great site!
-Erik
Thanks Erik
2.16GHz T7400 Core 2 Duo Swap:
(added 1/13/2009)
"I got my C2D CPU today and just installed it into my second Intel-based Mini. It's a T7400 2.16GHz processor. After doing the first upgrade to my other Core Solo Mini, this was a breeze and machine was running is under 20 minutes.
My main "burn-in" test was downloading and installing Windows updates on XP Home in a virtual machine using Vbox. The DL and save for SP3 pushed my Samsung HD to about 75 degrees C and at one point the CPU A temperature diode registered 80 C. Each core showed about 70 C at its highest. These were registered using Temperature Monitor version 4.4. (freeware utility available at https://www.bresink.com/osx/TemperatureMonitor.html)
I added SMC fan control, then set minimum RPM to 2500, which improved things roughly 10% across the board. So far so good.
This Mini was purchased as a used refurbished Core Solo 1.5 Ghz for just under $300. CPU was bought new online for $185 shipped. So final total of less than 500 bucks yielded a machine which I cannot buy from Apple, since they (currently) only offer a 2.0 GHz C2D as the fastest processor. Thanks again for the database, your commentary and stellar website.
(he later wrote)
With regard to the Mac Mini upgrade, I'd say it's an 8 (on the 1-10 scale). It achieves one primary task of making the machine faster, but at $150 (the current average for good used guaranteed T7200 and T7400 CPUs) the system still lacks dedicated video memory. Also of great consideration is the additional heat (BTUs/hour) will shorten hard drive life span. Possibly Apple chose not to install processors faster than 2.0 GHz partly due to this factor.
A couple other details to mention about my rig: it's dual-boot Tiger and Leopard.
I run Bresink's Temperature Monitor to check things but noticed since the CPU change on-screen monitor function (toggled by Command + 3) doesn't behave consistently. Sometimes trying to enable it results in no data appearing until I access Preferences and move a slider or affect some other parameter change to update the program. This is not a huge problem, just a minor glitch. I updated both OS installations with latest version and sensor drivers but this made no difference. I even trashed preference file in each OS, then relaunched program from a cold boot. The symptom persists.
Over the weekend I tried a PC game and also processed some sound using Audacity and Audio Hijack Pro. Additional performance from a faster dual-core CPU enhances the experience dramatically. This upgrade effort rewarded me with about 1/3 the processing time required as previously. Thanks again for all your efforts and information...
ALOHA, Chris"
2GHz T7200 Core 2 Duo Swap:
(added 11/11/2008)
"I recently purchased a Core Solo Mac Mini with a 60gb HD and 1MB ram. I purchased the Core Solo on Ebay for a great price. I bought 2GB ram and a Seagate 250GB 5400 rpm HD from OWC. Found a 2 Ghz Intel T7200 core 2 duo on Ebay for $114 shipped.
This is the second Mini I have upgraded and the take-apart an replace process went well. Used web available instructions (MacBidouille) to get me through the steps involved. I left the Combo drive in the Mini since I have an external Superdrive compatible from OWC.
The Mini has been rock solid for over a week. Smc fan control shows operating temps in the 50s centigrade under normal use which for me is word processing, email and web surfing. Total cost to me was $515 for a Mini that sells for about $699 at the Apple Store's refurb page. Overall, I rate the combination of these upgrades a 10. Thanks for a great Mac site.
-Ron"
Thanks Ron. The Mini (and iMac) Socketed CPUs are a real plus (hope they keep those in the future).
1.83GHz Core 2 Duo CPU Swap: (the nice thing about Intel CPUs is over time price drops a lot, especially on speeds that are not at the top end.)
(added 1/28/2008)
"I know that cpu upgrades are often more expensive than is justified by cost alone. That said, I replaced my 512mb Mac Mini 1.83ghz Core Duo with a 1.83ghz Core 2 Duo. I bought the Core Duo Mac Mini for $479 from the Apple refurbs page on Apple.com. I bought the Core 2 on Ebay for $125 shipping included and sold the Core Duo on Ebay for $60 for a net cost of about $65 minus Ebay fees. While I had the Mini disassembled, I also upgraded the ram to 2GB. The ram is from site sponsor OWC, a great Mac outlet on a great Mac info site, XLR8yourMac. At the time refurbs with DVDwriters and 1GB ram were selling for $599 on the Apple site if you could get one. My cost was $479+42+65 with the ram rebate of $6 after postage from OWC offsetting the Ebay charges. So with a total cost of $586, I did get under the cost of a refurb, and well under the(at that time) price of $799 for a comparable new Mini with only 1MB of ram.
Since specs and speed test results for these configurations of Mini are available elsewhere on the web, I have not tested and posted here. All in all, the experience of completely disassembling the Mini was invaluable as a confidence builder in future upgrade work that I may undertake.
For anyone contemplating a cpu upgrade on a Mini, I would suggest getting a set of 4 Philips nylon machine screws and nuts in size 4-40 by one inch long, in case the any of the four nylon fasteners which hold on the heat sink get damaged when you remove the heat sink.
With 2GB RAM and the Core 2 Duo processor, the Mini is responsive and fast enough for all my computing needs. This Mini is connected to a 65in. Toshiba HDTV rear projection tv with Eyetv2 and a now discontinued Miglia TV2 Mini HD as software and tuner. The video is terrific and with the Apple wireless KB and mouse, I can surf from the couch when I'm not recording or watching tv programs.
I've been reading the site and using your and the readers' hints and tips for many years now and couldn't be more satisfied. Thanks a lot for the good work, and thanks to OWC for being a customer friendly retailer.
-Ron L.
"
2GHz Core2 Duo Upgrade:
(added 2/12/2007)
"I've just completed an upgrade on a Mac Mini from the original 1.66GHz T2300 to a new Core 2 Duo 2.00 GHz T7200. Got it for $295.
Would be a scary amount of money just for an upgrade, but I'm putting the old Core Duo into an MSI Axis 945 GM system for use as a MythTV frontend.
Significant speed increases on anything processor intensive, which really shows up well in the XBench CPU tests. Disk is still the real slowdown, as the Photoshop tests show. I watched my Menu Meters CPU utilization during the Photoshop tests and only saw it go over 50% in 2 or 3 of the steps and not for very long, so its not a great indicator of the improvements.
I haven't watched temps much yet, but the machine never had problems before and the thermal paste I used was much higher quality than the stuff on the old one. I do use a fan speed mod that keeps the base
fan speed a little higher than the default, mainly to keep it from cycling up to high speed so often. The new processor should only generate 3 more Watts (34 vs 31).
Thanks for the great site and all the work you do. I read it religiously.
-Keith
The Photoshop benchmark from Retouch Artists:
Pre Upgrade : 3:46
Post Upgrade : 3:19
XBench 1.3 Before/After Upgrade: (Major category scores)
Results 78.29 / 88.36
System Info
Xbench Version 1.3
System Version 10.4.8 (8L2127)
Physical RAM 2048 MB
Model Macmini1,1
Drive Type ST98823AS
CPU Test 64.30 / 104.62
Thread Test 165.28 / 200.56
Memory Test 108.78 / 115.58
Quartz Graphics Test 110.33 / 140.09
OpenGL Graphics Test (spinning squares) 190.10 / 245.70
User Interface Test 280.37 / 269.25
Disk Test 24.56 / 24.33
Sequential 41.15 / 40.75
Random 17.50 / 17.34"
Xbench scores can vary run/run (especially disk scores).
This report is on a Core Duo swap - not a Core 2 Duo.
(added Jan. 16th, 2007)
"Machine: Mac Mini (Intel)
Original processor: Intel 1.5GHz Core Solo
Replacement processor: Intel 1.83GHz Core Duo (Model # T2400)
(other reports here are on Core 2 Duo swaps)
I picked up this processor inexpensively in OEM format. I bought it used, on ebay for just under $100USD. I was looking for the
biggest bang for my buck, and $100 for a 1.83GHz Core Duo was the cheapest I could do.
It was a fairly easy install procedure, only requiring a little bit of thermal grease. Working inside a Mac Mini is much like working inside a laptop. Mac OS X picked up the change in processors immediately, with no intervention on my part.
It's been stable and solid for weeks now, running at about 50° Celsius, which is much lower than my similarly clocked MacBook Pro. Xbench scores went from a 75 to a 94 with just the processor change. (http://db.xbench.com/merge.xhtml?doc1=201198&doc2=196335).
I would rate this an 8, because it was an easy install, and priced well, but it was not a "supported" upgrade. If I had screwed something up, I wouldn't have any official channels to get support from.
Thanks, Adam"
The prices for a (new in box) Core2 Duo 1.83GHz model is under $250 last I checked.
(See notes below from Dec 18th posting/price checks on Core 2 Duo Mobile CPUs - Core Duos would be
cheaper than Core 2's.)
(added Dec. 18th, 2006)
"i wanted to let you know i swapped my 1.5Ghz Mini's CPU with a T5600 (1.83GHz) Core 2 Duo and was still much cheaper than buying a 1,83 original mini. I paid 400 euro for the mini + 180 for the core 2 duo (1.83GHz) cpu so was 580 rather then 799 from apple store. ok, mine doesn't have superdrive (40 euro from ebay) and a smaller hd, but i think 20 gigs more hard drive space aren't worth 200 euros (especially now you can get 350GB usb drives for 150 euro).
-Diego
"
Nice savings. Typically the higher speed CPUs have a big price difference and you can save a lot of $$$ by buying one of the
lower speed models (and over time as faster speeds are intro'd, prices drop). I checked some prices online recently for mobile Core2 Duos that shows this. (Prices can vary, this is just a snapshot from last week as an example of the differences at a vendor)
Core2 Duo (socket M) (early Dec. 06 pricing)
- 1.83GHz - appx $242
- 2.0GHz - appx $296
- 2.16GHz - appx $420
- 2.33GHz - appx $650
(added Oct. 24, 2006)
"
This should say it all. :)
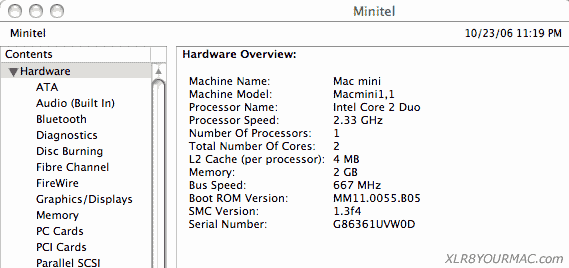
Got the CPU from NewEgg. Around $670. I didn't run any performance tests, but it is definitely snappier. Boot time in about 24 seconds, which is about the fastest I have seen in any of my Macs. I also installed a 160 GB drive (I was already maxed out in the memory department).
This mini originally had the 1.83 Ghz Core Duo (Late 2006 model Mini).
-Kim B.
"
(added 10/3/2006)
"I upgraded my Mac Mini to a Merom T7200 2.0GHz 4MB L2 Core 2 Duo (that's a lot to type) today and posted some early benchmarks and experiences. Regular applications are slightly faster, but I haven't done anything hardcore such as encoding HDTV to h.264 or any video editing yet.
Fan noise is definitely a bigger issue now than it was before, but I don't know how much is due to cramming in a 20% faster CPU with more transistors and how much is due to the 10.4.8 OS upgrade.
The article with some preliminary benchmarks is available at www.astrogoth.com/mac-mini-merom-upgrade-success-finally-or-do-i-speak-too-soon with a solicitation for other tests to try.
Thanks! Art.
"
(added Sept. 19th, 2006)
"
Hello, I just wanted to tell you that I transplanted a T7400 Core 2 Duo into my "new" (late 2006) Mini 1.66GHz/Combo Drive/2GB today, using Arctic Silver Ceramique as thermal paste.
The Mini recognizes the new CPU correctly as a Core 2 Duo 2.17 GHz.
The system has been absolutely stable so far (couple of hours). This is one fast devil now.
Even graphics are sped up - NoLimits (rollercoaster simulator) tracks still look odd (no vertex shading with GM950 GPU), but I noticed approx. 50 percent higher minimum frame rates (max fps are 95-100 as before). The system seems much more responsive overall, too. Just for fun , I also put a Pioneer DVR-K06 "super multi" in the mini. The drive is officially supported by Apple, and was immediately recognised by the mac.
(I asked him what price he paid, as in the past (2006 and earlier) the cost of the CPU could be almost as much as the Mini)
Here in Denmark, (fall 2006) I paid 462.29 (Euros), including 25 % Danish VAT. Assuming 1 Euro equals roughly US$ 1.20, and leaving out VAT, that would be 444 US dollars, 555 with VAT added. I know, this is economically insensible to put a killer CPU into a basis machine, and I'm not overly wealthy. But it's fun.
Best, Sebastian
"
(added June 12th, 2006)
"Core 2 Duo (Merom) Mac Mini CPU
Benchmarks in Windows XP Pro from SiSoft Sandra 2007 and OS X from Xbench 1.2 (not the greatest benchmark...) have been posted here:
(photo gallery including take-apart pix)
homepage.mac.com/macaholicg5/PhotoAlbum12.html (no longer online)
-macaholic
"
(Copy from the June 8th, 2006 news page)
Tony C. sent a link to a English translated forum post on 2.16GHz Core Duo CPU swap in a Mini. (Translator no longer online.) Includes some benchmark comparisons to G5 towers.
At first I thought this was just another T2600 (2.16GHz) swap, but some comments in the post mention a Merom T7400 (aka Core2, 4MB L2), I didn't think they were shipping yet (until August?) and down the translated page it mentions a "T2600" and the Apple System Profiler screenshot shows 2MB L2 cache, but in some of the text down the page (benchmark section) it says "Mac Mini/Merom 2.16GHz" (original Core Duo 2.16GHz is T2600).
I asked if any readers fluent in Chinese could clarify this from the untranslated page at www.oikos.com.tw/v4/viewtopic.php?id=20099, and a couple replied the article did mention using a Merom CPU.
"
i'm a native speaker of chinese. This Web site shows the new Merom in mac mini, it says the CPU is too new to be recognized by the
latest osx 10.4.6, so it shows Genuine Intel CPU, and what follows is the comparison with G5 Duo 2.5Ghz 250GB HD and 6.5GB Ram/ G5 duo 1.8Ghz with 160GB HD and 4GB ram. By the way Mac mini/Merom Core 2 Duo2.16G/5400rpm 80G HD/2GB Ram.
Hope this helps....
-'Elvis'
"
(As mentioned in previous posts, in 2006 those CPUs cost about as much as a Mac Mini.)
| 