Repair/Overhaul of PowerMac G5 Liquid Cooling System and CPU Boards
2.7 GHz Dual-CPU G5 built May 2005 - Delphi LCS
By Bill S.
Posted: July 22, 2010
(Later Revised for notes/info on materials, etc.)
This is a record of a repair and overhaul of my G5 with Delphi liquid cooling system done in October 2009. I have no information on any model other than that of this computer. Even the G5s vary in their hardware configuration.
Tools and Parts Required (for this computer)
1) One 9" long 2.5 mm hex driver from Rutland Tool & Supply Co. - Phone 800-289-4787 - Their item number 23322832, "2.5 mm, 9" arm, C/GRP T-Handle Hex Key USA," price $2.51. Manufacturer: Eklind, their part number 54925. (See Figure 1.) Used for removing the LCS.
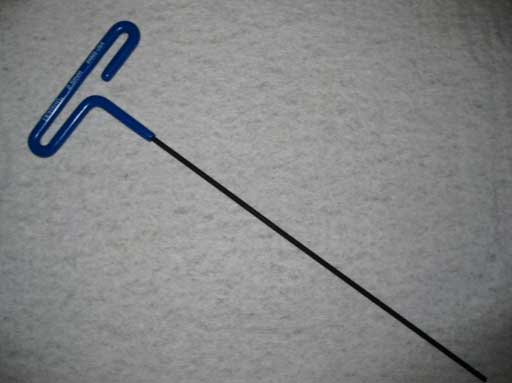
Figure 1. Hex Driver
2) O-rings from MSC Industrial Supply Co - Two required; I bought a package of 50 Viton O-rings identified as "Viton AS568A Aerospace Standard ID Number: 027." Dimensions: ID = 1.313", OD = 1.438", thickness = 1/16", price $12.12. (See Figure 2.) Used on the heat transfer modules.
(O-Rings listed above are for the 2.7GHz LCS. If you have a different series/LCS model - verify (measure) your original o-rings before buying replacements.) (made text red since it was missed by some in the past.-Mike)
(FYI on O-Ring Materials:
I don't know the exact type of Viton the O-Ring's from MCS are but a Wiki page on Viton lists one of the Viton family types ("F" - Terpolymers of VF2/HFP/TFE) as used for "Oxygenated Automotive fuels. Concentrated aqueous inorganic acids, water, steam." (emphasis mine, and granted Wiki pages are not always 100% accurate). A reader however sent a note that per www.aceseal.com/common_materials.html and www.marcorubber.com/materialguide.htm, although rated to 400°F (higher than Ethylene-Propylene), they list Viton (V/FKM on the former link, Type A on the latter) as not recommended for use with hot water and steam applications. Aceseal.com's page lists Ethylene-Propylene (EP, EPR, EPDM) for hot water/steam applications. (The Coolant additive raises the boiling point of the water of course but I think the reader was concerned those sites didn't list Viton for hot water applications.)
Regardless, Bill has noted the Viton o-rings he bought have not leaked after over a year of use. He was forwarded a copy of the reader's mail/links and may reply to this with specifics/data sheet info on the o-rings he bought. I've not done more digging into this personally than I've listed here.-Mike)
Update: Here's Bill's reply to the question about Viton use for this application:
My previous experience with Viton vacuum hoses and O-rings led me to choose that material. I had not seen the charts (on the links above), but have seen others like this one at www.rainbowrubber.com/VB.pdf. (Viton info PDF), Scrolling down to Table 2, Viton has a rating (by Dupont) of "1" (best) for water both above and below 80°C. Also in the text immediately following the table is this paragraph:
"Viton retains sealing force to prevent leaks even after compression for long periods in severe environments.
After 100 hours in air at 150°C (302°F), Viton retains more than 90% of its original sealing force, while seals of fluorosilicone, polyacrylate and nitrile retain only 70%, 58% and 40%, respectively."
IMHO the most important parameter for the O-rings in the Delphi LCS is retention of sealing force over long periods; Viton is outstanding in this respect. As to water temperature, the "Hardware Monitor" application on my G5 never reports higher than 90°C at the CPU chips, so although Viton may not be the right choice at, say, 100°C or higher (given an ethylene glycol mixture which raises boiling point), the material itself is rated for continuous use at extremely high ambient temperatures (see "150°C" in the paragraph above, and 204°C in Table 2).
I'm no expert on the comparative properties of the various materials. I do know that the white O-rings supplied by Delphi with my G5 leaked; I do not know what material they were made of. I also know that having checked for leaks recently (a month or so ago), I see no indication of wet surfaces anywhere in the LCS or at the O-ring interfaces. So my Viton O-rings have lasted 15 months so far with no problems. EPDM might very well work just fine; I have no experience with anything other than the OEM O-rings (bad) and Viton (good so far).
There is more information on Viton available by searching Google; www.pspglobal.com/polyethylene.html here is one more source. And another www.pspglobal.com/nfvitongrades.html (table) shows the variations in properties among different versions of Viton.
-Bill
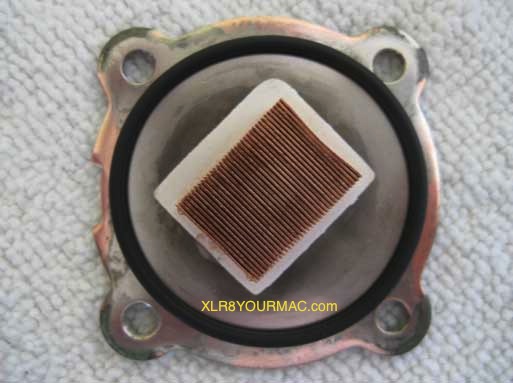
Figure 2. Viton O-Ring
3) Coolant - "Cooler Master RL-ACL-NNUB-GP Water Cooler," Newegg item number N82E16835103048, $11.99. (See Figure 3. Note: Product may be superseded... see Newegg Water Cooling web page.) Liquid shown in the photo is the remaining amount after refilling the empty LCS.
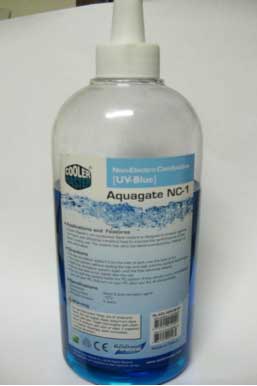
Figure 3. Coolant
4) Thermal grease - "Masscool G751 Shin-Etsu Thermal Interface Material," Newegg item number N82E16835150080, $2.99. Supplied in syringe. (Note: Product may be superseded... see Newegg Water Cooling web page.) Used on the upper mating surface of the heat transfer modules. Use this material very sparingly - about 1/8" diameter glob in the center of the raised boss.
Other Recommended Tools
5) Handy for this particular job: Craftsman Handi-Cut pliers, gas pliers, X-acto knife, flat-blade screwdriver, Allen wrench. (See Figure 4.)
a) Handi-Cut pliers make a neat 90° cut on hoses.
b) Gas pliers are for compressing hose clamps.
c) X-acto knife is useful for prying up the plastic locking pin in the locking insert on the "G5"-labeled heat shield, for slicing through stuck hoses, and also for careful cleaning of salt ("white rice") deposits between components on the CPU cards.
d) Screwdriver is good for twisting to open up slice cuts in a stuck hose, before pulling it off a nipple.
e) Allen wrench is more convenient than 9" hex driver when removing or installing CPU screws around the heat sink interface and for the bottom plate removal.
f) #2 Philips screwdriver (not shown) is needed for CPU board removal from LCS chassis.
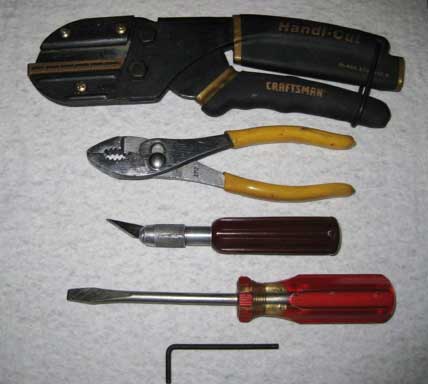
Figure 4. Recommended Tools
Handy Stuff
6) Having an oil drain pan or similar in which to place the LCS is handy to contain drained coolant.
7) If you plan to remove any hoses, a few feet of fuel hose will be necessary to replace hoses, for those cases where the hoses have "bonded" to their connections. To save breaking plastic nipples if a hose is stuck, carefully slice it from the end along its length, and twist the screwdriver in the cut to pry it apart, which will break the bond but not the nipple. Be careful not to slice into the nipple. Hose is available at most auto stores, but I.D. probably varies with computer model, so if you plan to replace any hoses, remove one OEM hose and take it with you. (If I remember correctly, my hoses were 5/16" I.D., but am no longer sure.) Note that if the O.D. of your replacement hose is larger than the OEM hose, there is one place where the replacement cannot be used (at the radiator input port). I reconnected the OEM hose there.
Before You Start
8) Determine the location of the leak(s) if you can. On my G5, I could see "white rice" deposits between the heat transfer modules and the CPU cards (see Figure 5). If you hold a bright flashlight against the front grille next to the USB port, contamination in this area can be seen before opening the computer. This appears to be some sort of salt formed from the action of leaking coolant on the metal plating of the heat transfer modules. No problem seen here means any leak is somewhere else. A problem at this spot, though, is serious. It means the CPUs must be removed from the LCS after the assembly is removed from the computer, which in turn means you need thermal grease and new O-rings. If only the radiator coolant pump is leaking, or a hose, the CPUs could be left mounted to the LCS for the overhaul (unless you want to perform preventive maintenance).
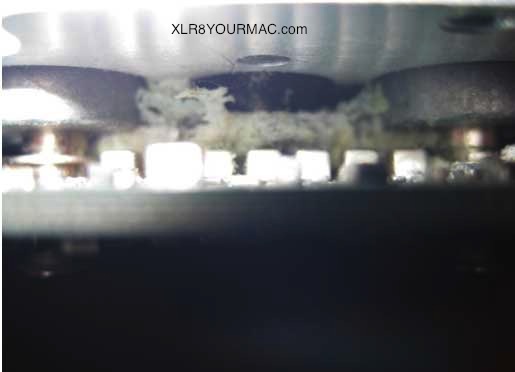
Figure 5. "White Rice" from O-Ring Leakage
9) If coolant leakage has destroyed your power supply or rusted through your computer case, this article will not help you. My repair/overhaul focussed only on the LCS itself plus a clean up of the CPU cards, since I was lucky enough to have no damage beyond that.
10) Review the ifixit guide to removing covers and cooling unit thoroughly. At its step 8, note that you can use an X-acto knife blade tip to gently pry first one side and then the other of the plastic locking pin to remove it. Then the locking insert can be removed to allow the heat shield to slide back. (In my opinion the plastic pin is not needed; the locking insert will hold the shield in place without it, but it can be re-inserted if you like.) I did not perform steps 10 - 11 (removing the fan assembly), but it's probably a good idea. It's also possible other builds of this model do require fan removal in order to remove the LCS. Figure 6 shows my computer after LCS/CPU assembly removal. Note that the ifixit steps call out eight T10 screws holding the CPU/LCS assembly in place. On my G5 these are 2.5mm Allen screws, so it required the tool shown in Figure 1.
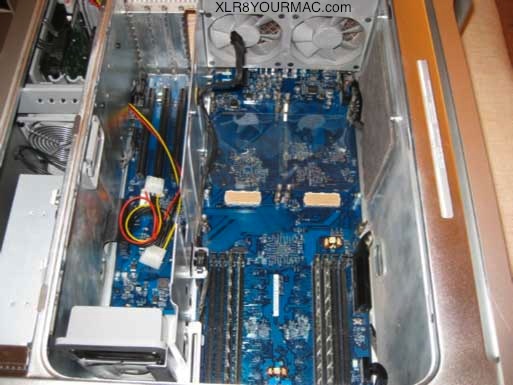
Figure 6. G5 Interior
= Continue to Page 2 =
Index of PowerMac G5 LCS Repair Article
Page 1 | Page 2 | Page 3 | Page 4 | Page 5 | Page 6
|
