"2009 Mac Pro Upgrades (Notes updated on Dec 2016 for Dual CPU Tray swap)
I wanted to share what I've done with my machine as others have done... I found a 2.66GHz 2009 Mac Pro with 6GB ram for $530 on eBay and jumped on it. A local seller had 32GB of 1333MHz ram available for $260 so I gobbled that up as well. When the machine arrived I swapped over my 1TB velociraptor drive, the 7950 card, and installed the ram.I then flashed the EFI to 2010 specs (macpro 5,1). (Using script from netkas.org. Also see notes in 2nd report below on having 5,1 EFI updater download ready.) Not seeing any difference I then decided to buy a new processor. Back on eBay I found an X5690 3.46GHz CPU for $215. Got it a few days later, and literally within 10 minutes after opening the packaging, it was installed and up and running with no problems whatsoever. The installation couldn't be easier and certainly a heck of a lot easier than on the 2008 machine. (FYI - While the CPU tray is out, check the Northbridge heat sink plastic retainers to make sure they're still intact.)
All benchmark scores went through the roof with this new processor and increased ram speed. $1,000 for a maxed out Mac Pro with better specs than all but the new machine? Yes please!
(Updated comments from 11-30-2016 follow)
... Well I continued onward recently. I bought a dual 2.26GHz processor tray off of Ebay for $410.
Got another X5690 chip for $200. I put both X5690s onto the dual processor tray and after some effort to get the heat sinks on but not too tight, it works perfectly.
(Reader FYI: Some notes about that on the 2009 Mac Pro 12-Core upgrades page. 2010-12 Mac Pro CPUs have IHS (heat spreader), but not 2009s. Some have removed the CPU IHS. A reader eventuallly did after seeing a Youtube video on removing the Integrated Heat Spreader, but some risk with that.)
I'm into this machine for a total cost of $1,600, less what I sold older components for, and OWC still sells a similar configuration for twice that.
-David W.
Thanks for the update Dave and sorry for the late posting."Mac Pro 4.1 to 5.1 (EFI) and Hexa core X5690 CPU Upgrade
Hi, after reading several tips, tricks and great How-to's on your site, I would like to add my experience doing a upgrade of my Mac Pro "Quad Core" 2.93GHz (2009/Nehalem) running OS X 10.10.x
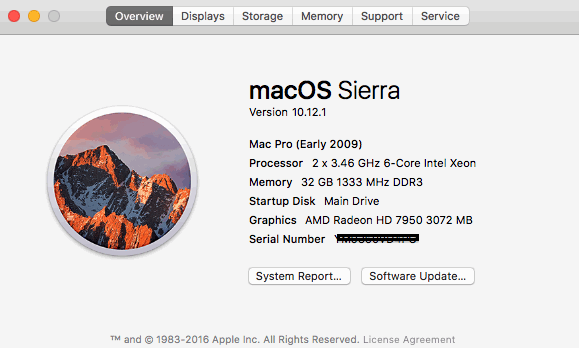
First, I had updated the (EFI/bootrom) ROM to change the (2009) Mac Pro 4,1 virtually into a 5,1 by using the Mac Pro Firmware Upgrade Utility from Netkas.org. I also get this nasty script error, that the upgrade tool / script couldn't find the proper 5.1-ROM file. (An earlier report noted the 5,1 file at apple was moved and suggested downloading the EFI update and having it on your local HD for use with the 'unofficial' updater script. Here's the 2010 Mac Pro EFI Update 1.5 (MP51.007F.B03) D/L page.) It seems that apple stopped the functionality of this unofficial upgrade tool by forcing me first to give my email address and than allow me to download the dmg-file. After downloading I opened the disk image, started the upgrade tool an voila, my (2009) Mac Pro 4,1 transformed into a (2010) Mac Pro 5,1. (With 6-core cpu, and 1333MHz ram support. IIRC also enables audio via MDP if an installed graphics card has DP/MDP.)
On eBay I have found 4 modules of 8GB Hynix PC3-10600R ECC/CL9 REG Server RAM for 200€. (Because one of my 4GB RAM chip has died, I had to buy a replacement.) After installation, the RAM was accepted and all 32GB were used at 1066 MHz. (Before CPU Upgrade, see note below after CPU Upgrade - 1333MHz reported. Your dimms are Registered types? Since your mac pro now has the same 5,1 efi/bootrom as the 2010's, also recall this Apple doc on Mac Pro (Mid 2010): Registered DIMM support (HT4584 article no longer online) - just a FYI to others not to mix R-DIMMs with unregistered DIMMs. I remember an apple forum post about problems with R-dimms that may have been from someone trying to mix types.)
After testing and using the new Mac for a while, I found a used Intel Xeon X5690 3.46GHz 6.4GT/s, 12M 6-Core SLBVX for 280€. In my local computer shop finally I bought thermal paste from Arctic (MX2 for 5€). The needed 130mm (long) hex wrench was already sitting in my toolbox. The heart surgery was done within 15 min. After removing the CPU tray, I placed the hex wrench into the upper right screw hole (position2); I mark the position of the wrench with a soft pencil and count every turn. After 5 turns I switched to the next hole and so on in a diametrical way: 2-0-4-1-3
.....1....2
0
.....3....4
After 12 rounds for each screw I could loosen the heat sink without any problems.
The old thermal paste was easily removed by using a lint-free cloth from the heat sink and the CPU.
Because of switching a 2.93GHz Nehalem there was no need of placing a thermal pad on the upper electronic parts because the thickness of the X5690 compared to the W3520. (Guide with pix was pulled.) So, all end up by pacing a small amount of the Arctic MX2 thermal paste (a drop plated with a plastic scoop) on the new placed CPU.
The cleaned heat sink was carefully placed on his position - watching the sensor connector to become placed correctly and that the heat sink fits onto the two leading needles on the CPU tray.
The screw were tightened in the same procedure as shown above. Starting with position 2 (0-4-1-3) I turned the hex wrench 3 times and so on until reaching 12 turns. By the last turn you should be careful not to use to much force because you could bent the CPU connectors and that could kill your investment 8)
So, replacing the tray, connecting all cables I start the Mac Pro by pressing CMD-P-R to reset the PRAM.
After rebooting, I checked the system info for the CPU and RAM. The CPU was really the one I have purchased and the RAM speed has switched from 1066 to 1333 Mhz.
Monitoring the heat sensors with "Mac Fan Control" I start Cinebench R15. After stress testing the CPU temperature goes up to max. 72°C (and the fans didn't start blasting off so all seems to be fine...)
Thanks to all for testing and supporting this upgrade!!!!
Maybe some of you are interested in what I received for my bucks. Overall a total of 60% speed bump is reachable when running Cinebench R15. Before switching the CPU my bench results were round about 470 Points (several measurements). After switching the to the X5690, the Mac reaches about 790 points (several measurements).
But all other programs that makes use of the two additional cores also speeds up. Using DXO or similar software got the speed bump I was hoping for. Loading large graphic files and manipulate them works snappier with far less pauses. No time for a cup of tea anymore 8).
Overall I am very happy that I finally switched the CPU and the price/power calculation is fine for me.
So, that's it. If you have further questions, please contact me.
Kind regards, Jörg"
